


Bringing the golf course into your home sounds like an expensive dream, but it doesn’t have to be. While launch monitors and projectors have become more accessible, the cost of a professional enclosure can still be a major hurdle. That’s where a well-executed golf simulator impact screen diy project comes in. Building your own screen is the single biggest way to save money without sacrificing quality or performance. This guide will walk you through every step, from sourcing affordable materials at your local hardware store to assembling a frame that’s as sturdy as any pre-built kit. Get ready to create a professional-grade setup on a budget that leaves you with more cash for other golf gear.
Key Takeaways
- A Successful Setup Starts with a Solid Plan: Before you buy any materials, measure your room for full swing clearance, map out your projector placement, and account for safety margins. A little forethought prevents major headaches and ensures your space is both functional and safe.
- Use Materials Designed for Golf Impact: A standard projector screen won't survive. Your setup's longevity depends on using a multi-layer impact screen, a sturdy frame (like EMT conduit), and ball bungees that allow the screen to flex and absorb energy safely.
- Fine-Tune the Details for a Professional Feel: Small adjustments make a huge difference. Dialing in the perfect screen tension minimizes noise and bounce-back, while adding frame padding and a simple ball return system improves safety and makes your practice sessions more efficient.
What Makes a Great Impact Screen?
Your impact screen is the centerpiece of your home golf simulator. It’s where the digital world meets the real one, so it has to do two things perfectly: absorb the force of a real golf ball and display a crisp, clear image from your projector. Finding the right balance between durability, image quality, and safety is what separates a frustrating setup from a truly immersive one.
Think of it as more than just a target. A great screen contributes to a quieter experience by muffling the sound of impact, and it plays a huge role in safety by minimizing ball bounce-back. Before you start building, it’s essential to understand the three core components that make an impact screen work: the material it’s made from, its size relative to your space, and its ability to handle high-speed impacts safely. Getting these elements right from the start will save you time, money, and a few patch jobs on your drywall down the road.
Choose the Right Material
The first thing to know is that a standard projector screen won't survive a golf simulator. It’s simply not designed to handle the impact and will likely tear after just a few swings. While some DIYers have found temporary success with budget-friendly options like heavy-duty tablecloths or even TPO roofing membranes, these materials often compromise on image quality and won't stand the test of time. For the best experience, you’ll want a multi-layer fabric specifically engineered for golf impact. These professional-grade screens offer a smooth, bright surface for your projected image while providing the durability and noise-dampening qualities you need for thousands of shots.
Find the Perfect Size
When it comes to size, your room dictates the screen, not the other way around. The goal is to go as large as you can to create an immersive feel, but you must leave a safe buffer zone around the entire screen. A good rule of thumb is to leave at least one foot of space on the sides, top, and bottom. This prevents errant shots from hitting a wall or ceiling and gives your mounting system room to flex. Before you buy any materials, measure your wall's height and width carefully. This will help you choose a screen that maximizes your playing area while fitting safely within your space, which is a key step when planning out customizable golf rooms.
Understand Impact Resistance
A great screen stops the ball safely, without sending it ricocheting back at you. This is achieved by creating the right amount of tension. The screen shouldn't be stretched as tight as a drum; it needs a little give to absorb the ball's energy. Most setups use bungees or cables to attach the screen to a frame, which allows it to flex on impact and gently drop the ball to the floor. Remember, even the best golfers miss the screen sometimes. That’s why it’s crucial to protect the area around your setup with an enclosure or side netting, which you’ll often find included in complete simulator bundles.
Gather Your Materials and Tools
Before you start building, you need to go shopping. Creating a great DIY impact screen is all about starting with the right components. A solid plan is one thing, but having quality materials and the right tools on hand will make the entire process smoother and give you a much better final product. Think of this as your master checklist for the project. We’ll cover the screen material itself, the hardware needed to build a sturdy frame, and the essential tools you’ll want within arm’s reach. Getting everything organized first means less running back to the hardware store later.
Screen Material Checklist
The heart of your setup is the screen, and you have several options depending on your budget and desired performance. A dedicated, multi-layer impact screen material is your best bet for durability and a crisp projector image. Look for materials designed to absorb impact, reduce noise, and resist stretching. For a more budget-friendly approach, some DIYers have found success with heavy-duty canvas, archery netting, or even thick moving blankets, though these may sacrifice image quality and won't last as long. When you choose your material, consider its weave tightness for a clear picture and its thickness for absorbing the force of a real golf ball.
Frame and Mounting Hardware
Your screen needs a sturdy frame to hold it taut and in place. The most common and cost-effective choice for a DIY frame is 1-inch EMT (Electrical Metallic Tubing) conduit, which is strong, lightweight, and easy to cut. You'll need corner fittings to connect the pipes and create your rectangular frame. To attach the screen, you’ll want grommets installed along its edges and a set of ball bungees. These bungees provide the perfect amount of tension while allowing for a little give on impact, which protects the screen from tearing. You’ll also need mounting hardware like pipe brackets or eye bolts to secure the frame to your walls, ceiling, or floor.
Essential Tools for the Job
You don’t need a professional workshop, but a few key tools will make this project much easier. First, you’ll need a reliable tape measure and a level to ensure your frame is square and your screen is perfectly positioned. If you're using EMT conduit, a pipe and tube cutter will give you clean, straight cuts. A power drill is essential for installing mounting brackets and any other hardware. You’ll also want a grommet installation kit if your screen material doesn’t come with them pre-installed. Finally, don’t forget the basics: a pencil for marking, a step ladder, and maybe a friend to help you lift the frame into place.
Plan Your Impact Screen Setup
Before you drill a single hole or cut any material, take a moment to plan your setup. A little bit of forethought here will save you major headaches down the road and ensure your simulator room is safe, functional, and immersive. Think of this as creating the blueprint for your perfect golf sanctuary. Getting these four key elements right—space, safety, projection, and lighting—is the foundation for a DIY impact screen that you’ll love for years to come.
Measure Your Space
First things first: grab a tape measure. You need to know the exact height, width, and depth of the area where your screen will go. Don’t just measure wall-to-wall; think about the functional space. You’ll need enough room to swing your longest club without hitting the ceiling or a wall. A good rule of thumb is to have at least 10 feet of ceiling height. Also, remember to leave extra room behind the screen for impact absorption—at least 12 inches is ideal. This buffer prevents the screen from smacking against the wall, which protects both your screen and your home. Planning this out helps you customize your golf room to fit your exact dimensions perfectly.
Account for Safety Margins
Even the pros have an occasional shank, so planning for mishits is non-negotiable. Your impact screen will stop direct shots, but what about the ones that go wide? Even if you don't have a full enclosure, you'll need to add protection for your walls and ceiling. Think about installing foam tiles, acoustic panels, or heavy-duty netting around the primary impact zone. This not only protects your drywall from stray golf balls but also helps dampen the sound. A well-placed safety margin gives you the confidence to swing freely, knowing that an errant shot won’t result in a costly repair. You can find great ideas for how to hang an impact screen and add protection without a full kit.
Position Your Projector
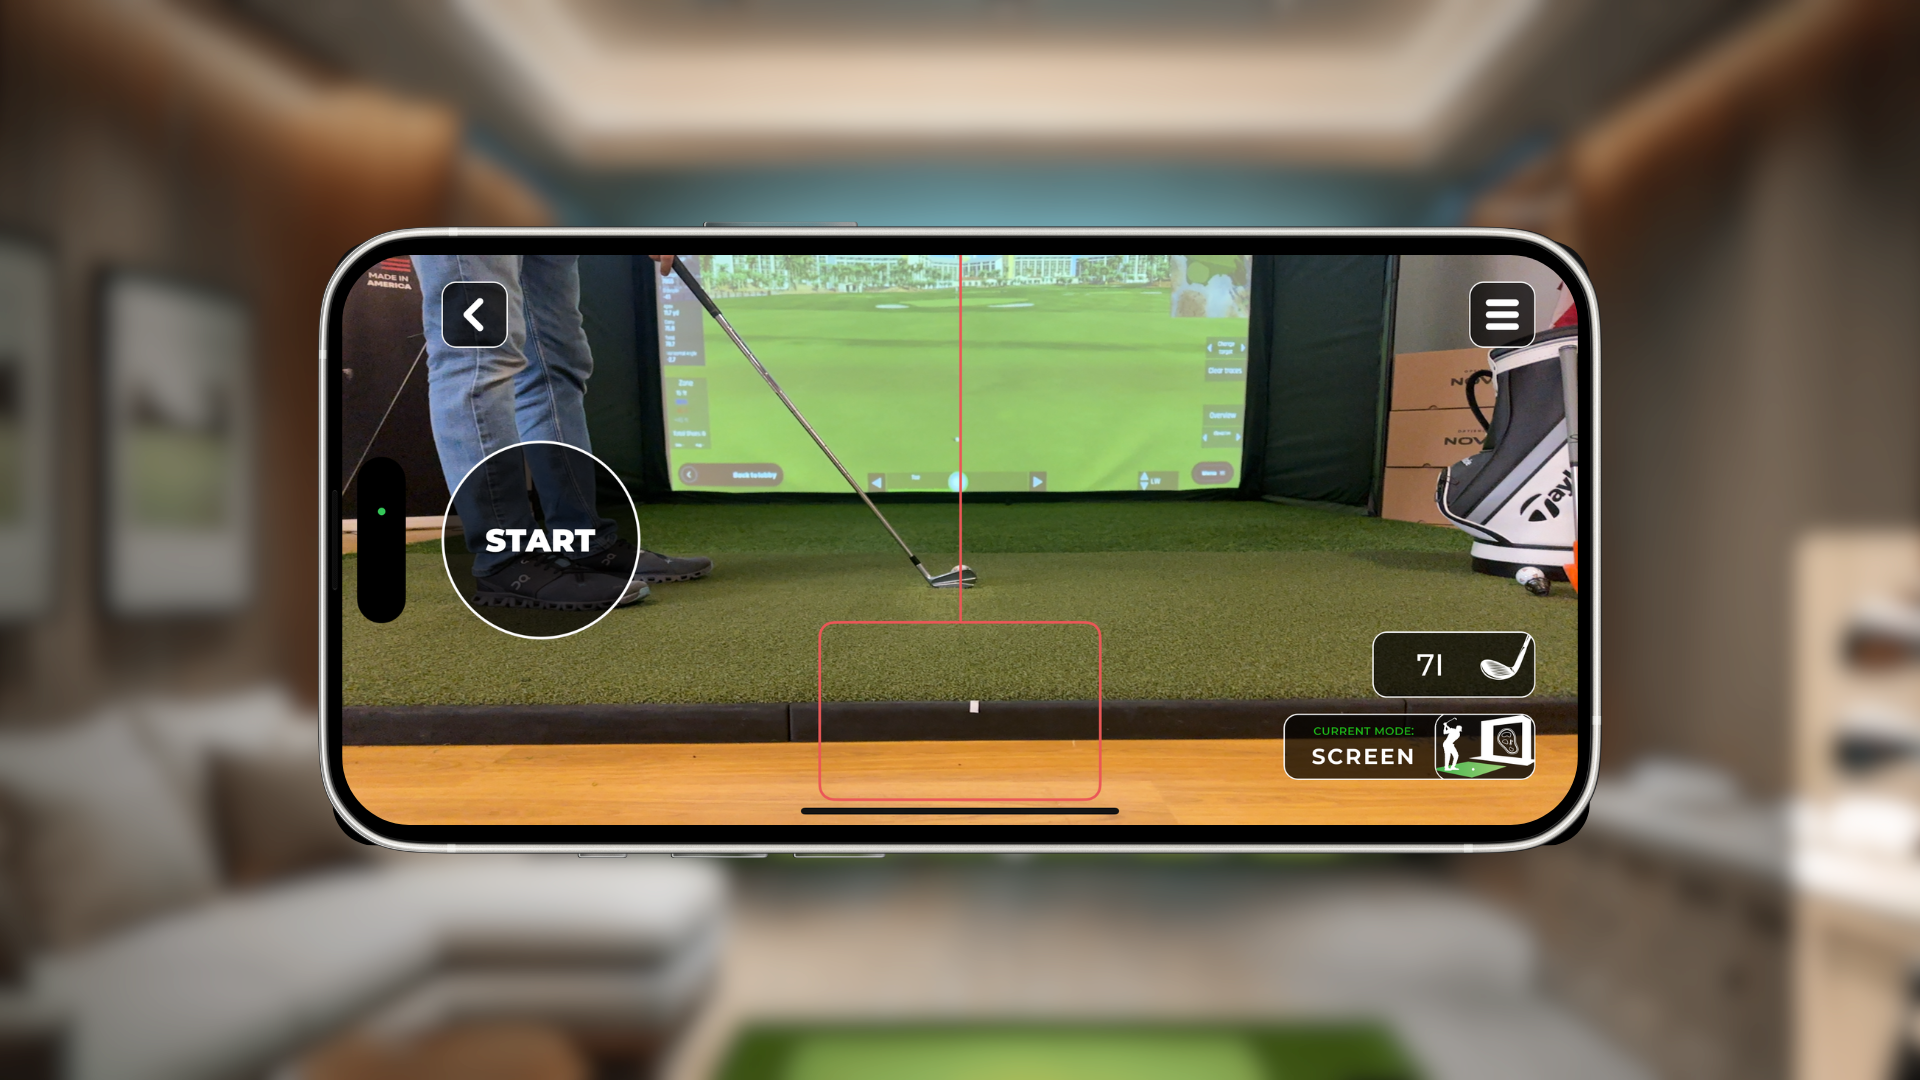
Your projector brings your simulator to life, but its placement is critical. The goal is to fill the entire screen with a bright, clear image without your body casting a shadow when you swing. This is determined by your projector’s “throw ratio.” A short-throw projector can create a large image from a short distance, making it ideal for most indoor setups. You’ll want to mount it on the ceiling, just above and slightly behind the hitting area. To create a truly immersive experience, aim to have the projected image extend all the way to the floor. This makes it feel like you’re really standing on the fairway.
Consider Your Lighting
Controlling the light in your simulator room is key to getting a crisp, vibrant image. Ambient light from windows or overhead fixtures will wash out the picture, making it look faded. Your best bet is to make the room as dark as possible by using blackout curtains or shades. However, you still need to see your ball and stance. The solution is to use directional lighting, like track lights with dimmers, focused only on the hitting mat. This illuminates you and your ball without spilling onto the screen. If you can’t achieve total darkness, consider a high-contrast gray screen, which helps make colors pop even in brighter rooms.
Build Your Impact Screen, Step-by-Step
Alright, you’ve planned your space and gathered your materials. Now for the fun part: bringing your impact screen to life. This is where your vision starts to become a reality. Don't worry, you don't need to be a master builder to get this done. We'll walk through it one step at a time. If you ever feel like the DIY route isn't for you, remember you can always explore a pre-designed golf room bundle to simplify the process. But if you're ready to build, let's get started.
Step 1: Build the Frame
First things first, you need a solid frame to hold your screen. A sturdy frame is the foundation of your setup, ensuring your screen stays taut and secure, even against your most powerful drives. The most common and budget-friendly material for this is 1-inch Electrical Metallic Tubing (EMT), which you can find at any major hardware store. You'll cut the pipes to your desired dimensions and connect them with corner fittings. If you want to skip the pipe cutting, you can find pipe framing kits online that come with pre-cut pipes and all the necessary connectors, which can be a huge time-saver.
Step 2: Install the Screen
With your frame assembled, it's time to hang the screen. The goal here is to create a stable anchor point that can handle the repeated impact of golf balls. A great method is to mount a 1/2-inch pipe from wall to wall, just behind the top of your frame, using pipe brackets. For extra support, especially on wider screens, adding an L-shaped brace in the middle of the pipe will prevent any sagging over time. This approach ensures your screen hangs straight and absorbs shock effectively, giving you a reliable and long-lasting surface for your simulator. You can find detailed guides on how to hang a screen without a full enclosure if you need a visual.
Step 3: Get the Tension Just Right
Achieving the perfect screen tension is a balancing act. Too loose, and you'll get a saggy image and excessive rebound. Too tight, and the screen can wear out faster and create a loud, drum-like noise on impact. The sweet spot provides a smooth, flat surface for a crisp projector image while absorbing the ball's energy with minimal bounce-back. Use heavy-duty zip ties or bungee cords through the grommets on your screen to attach it to the frame. This allows you to make small adjustments, tightening or loosening each point until you get the feel just right for your swing speed.
Step 4: Add Protective Padding
Now, let's talk safety and protection. An errant shot that hits the metal frame can cause a dangerous ricochet and damage your equipment or your walls. A simple and highly effective way to prevent this is by adding padding around the entire frame. You don’t need anything fancy; a popular DIY solution is to use pool noodles. Just slice them open lengthwise and wrap them around the pipes. You can secure them easily with zip ties. This small step adds a crucial layer of protection, absorbing the impact from off-target shots and giving you peace of mind while you play.
Step 5: Set Up a Ball Return System
Constantly bending over to pick up golf balls can break your rhythm. A simple ball return system not only saves your back but also makes your practice sessions much more efficient. You can build a small, angled ramp at the base of your screen using some scrap 2x4s and a piece of plywood. Just stack the wood to create a base and lay the plywood on top, creating a gentle slope of about 30 degrees that leads back toward your hitting area. This ensures your balls roll back to you smoothly after every shot, letting you stay focused on your swing.
Mount Your Screen Securely
Once you’ve built your frame and attached the screen, the final construction step is mounting it. How you secure your screen impacts everything from image quality to safety and screen longevity. A loose screen will sag, creating a poor projection surface and causing excessive rebound. A properly mounted screen, on the other hand, will be taut, quiet, and safe. Let’s look at the most common ways to hang your screen for a professional-quality finish.
Wall Mounting Techniques
For a clean, built-in look, mounting your screen directly between two walls is a fantastic option. A popular method involves running a sturdy half-inch pipe from wall to wall, held in place by pipe brackets. If your room is extra wide, you can prevent the pipe from sagging by adding a central L-shaped brace mounted to the back wall. To get that perfect, drum-like tension on the sides, install eyelets into your side walls every 12 to 18 inches. Then, use ball bungees to attach the screen’s grommets to the eyelets for a secure and easily adjustable fit. If you have questions about your specific room, you can always contact an expert for advice.
Ceiling Mounting Options
If your wall configuration isn’t suitable for mounting, hanging your setup from the ceiling is another great solution. This approach often involves using a durable, high-impact netting, like one designed for archery backstops. You can hang the netting from one side wall, run it across the ceiling, drape it over the pipe holding your screen, and secure it to the opposite wall. This method does double duty: it supports the screen while also creating a protective enclosure that will catch any stray shots that go high. It’s a smart way to protect both your screen and your ceiling.
Freestanding and Floor Setups
If you’d rather not drill into your walls or ceiling, a freestanding frame is the way to go. For these setups, it’s crucial to protect the bottom edge of your screen. You can do this by building a small ramp at the base that angles down toward your hitting area. Simply stack some scrap 2x4s and lay a piece of plywood on top at roughly a 30-degree angle. This ramp will stop low shots from damaging the screen and conveniently roll your golf balls back to you. For a complete, ready-to-go option, check out our RSG Bundles, which include freestanding enclosures.
Fine-Tune Your Screen's Performance
Once your impact screen is built and mounted, the real fun begins. Getting your screen set up is a huge accomplishment, but fine-tuning its performance is what transforms a good setup into a great one. Think of it like dialing in a new driver—a few small adjustments can make a world of difference in feel, accuracy, and enjoyment. By focusing on details like impact absorption, screen tension, and image quality, you can create a more realistic, durable, and immersive experience that truly rivals being on the course.
This final stage is all about optimizing your screen to work perfectly with your space, your swing, and your simulator. It’s where you get to address the little things that can make or break your practice sessions. We’ll walk through how to manage everything from ball rebound and impact noise to the crispness of your projected image. These adjustments will not only improve your gameplay but also help extend the life of your screen, ensuring you get years of use out of your hard work. Let’s get your screen perfectly dialed in so you can focus on what matters: your game.
Improve Impact Absorption
The first rule of impact screens is that they need to be made for impact. It might be tempting to use a standard projector screen, but it simply won’t hold up to the force of a golf ball. The material needs to be durable enough to stop a high-speed ball while also having enough give to prevent dangerous bounce-back. A quality screen is designed to absorb and distribute that energy safely. When you build your own golf room, choosing a fabric specifically engineered for golf simulation is the most important decision you'll make for both performance and longevity.
Optimize Screen Tension
Finding the right screen tension is a balancing act. Too loose, and you’ll get a saggy image and excessive wear from the screen deforming on impact. Too tight, and the ball will bounce back too quickly, which can be a safety hazard. The sweet spot provides a firm, flat surface for a great picture while absorbing the ball’s impact with a satisfying thud and minimal rebound. Most DIY setups use bungees or heavy-duty zip ties, which allow you to make small adjustments until you find the perfect feel for your swing speed.
Sharpen Your Image Quality
For a truly immersive experience, you want the projected image to fill your entire screen. A picture that stops short of the edges or spills onto the walls can take you out of the moment. Take some time to adjust your projector’s settings, including zoom, focus, and keystone correction, to perfectly match the image to your screen’s dimensions. The goal is to create a seamless visual from floor to ceiling, making it feel like you’re stepping right onto the fairway. This attention to detail is what makes your simulator feel less like a game and more like a round of golf.
Manage Sound and Rebound
A loud thwack and a ball rocketing back at you can ruin an otherwise perfect shot. A well-tuned screen helps manage both. The key is in the mounting system. Using bungee cords or a cable system to attach the screen to the frame allows it to flex upon impact, which dampens the sound and safely absorbs the ball's energy. This design significantly reduces rebound, causing the ball to drop harmlessly to the floor instead of flying back. Many high-quality simulator bundles include screens and mounting hardware designed specifically for this purpose.
Reinforce for Longevity
Your impact screen is going to take thousands of hits, so reinforcing it from the start is a smart move. The edges and mounting points are the most common areas to fail. A great DIY technique to prevent tearing is to wrap the edge of the fabric around a piece of wood, like a 2x2, before stapling or securing it to your frame. This distributes the tension across the entire length of the wood instead of concentrating it on individual grommets or attachment points. A little extra reinforcement now will save you from having to repair or replace your screen down the road.
Keep Your Screen in Top Shape
You’ve put in the work to build your own impact screen, and now it’s time to make sure it lasts. A little bit of regular maintenance goes a long way in protecting your investment and ensuring you get a crisp, clear picture for years to come. Think of it like maintaining a real golf course—a bit of upkeep keeps everything playing perfectly. By performing routine checks and cleaning your screen the right way, you can prevent small issues from turning into major headaches. This proactive approach will keep your screen looking and performing its best, so you can focus on what really matters: lowering your handicap.
Perform Regular Inspections
Set aside a few minutes each month to give your setup a quick once-over. Check the screen for any signs of fraying, thinning, or stress, especially in the areas where you hit the most. Look at your mounting hardware, like bungees or straps, to ensure they’re still secure and haven’t lost their tension. It’s also smart to inspect the area around your screen. Even if you don't have a full enclosure, you still need to protect your walls and ceiling from stray shots. Catching a loose hook or a sagging corner early can save you from a much bigger repair job later on.
Follow Cleaning Best Practices
Keeping your screen clean is essential for a great image and a long lifespan. First, always use clean golf balls to avoid transferring dirt, grass, or scuff marks. For routine cleaning, a simple wipe-down with a soft, damp cloth is usually all you need. If you encounter a tougher spot, use a mild soap and water solution, but be sure to test it on a small, inconspicuous area first. Avoid harsh chemical cleaners or abrasive brushes, as they can damage the screen’s surface. The right material makes a huge difference; some users have found that even a durable DIY fabric can hold up well to regular use, proving that a quality surface is easier to maintain.
Prevent Common Wear and Tear
The best way to fix a problem is to prevent it from happening in the first place. One of the most effective preventative measures is a ball return ramp or a floor buffer at the bottom of your screen. This simple addition protects the screen from low shots and scuffs while conveniently rolling the balls back to you. Also, ensure your screen is hung securely to prevent unnecessary stress on the fabric. If you’re building a wider setup, adding a middle support brace is crucial for keeping the screen flat and preventing sagging over time. These small details in your initial build will significantly reduce wear and tear.
Troubleshoot Common Problems
Even with the best care, you might run into a few common issues. If you notice your screen starting to sag, it’s likely a tension problem. Check your bungees or straps and tighten them as needed. For wider screens, a lack of central support is often the culprit. If you see dimples or premature wear, it could be that your screen material isn't designed for golf ball impacts—a common issue when people try to use standard projector screens. If you’re facing a challenge you can’t solve, don’t hesitate to reach out to our technical support team for advice. We’re always here to help fellow golfers.
Take Your Setup to the Next Level
Once your impact screen is built and mounted, you can start refining your space to create a truly professional-grade golf simulator room. These next steps focus on safety, performance, and longevity, transforming a basic setup into an immersive experience you’ll enjoy for years. From protecting your walls to getting the most life out of your screen, a few extra touches can make all the difference. Think of this as the finishing stage, where you add the details that elevate your space from a simple practice area to a dedicated golf haven. Let's look at how you can improve your DIY project.
Install Protective Netting
Even the best golfers have an off day. A shanked shot can do serious damage to drywall, windows, or anything else in your golf room. That’s why protective netting is a must-have. If you don't have a full enclosure, you can create your own safety zone using netting. Hang it along the sides and ceiling of your hitting area to catch any stray balls. You can also add foam padding to the frame pipes and any hard surfaces near the screen. Think of it as the first step to customizing your golf room, ensuring every swing is a safe one. This extra layer of security gives you the confidence to swing freely without worrying about costly mishaps.
Ensure Proper Ventilation
A golf simulator room can get stuffy, especially during a long practice session. Proper ventilation is key for both comfort and equipment performance. Your projector and launch monitor generate heat, and good airflow helps them run efficiently and prevents overheating. If you’re using an enclosure, make sure to leave adequate space around it—at least a foot behind the screen and several inches on the sides. This gap allows air to circulate freely. A simple fan can make a big difference, or you could consider your room's existing HVAC system to keep the air fresh and cool while you play. This small detail ensures your equipment lasts longer and your practice sessions stay comfortable.
Optimize Your Room Lighting
The right lighting creates an immersive experience and ensures your launch monitor can accurately track your shots. Your goal is to have a dark environment around the screen to make the projected image bright and crisp, while keeping the hitting area well-lit. Avoid any direct light shining onto the screen, as it will wash out the image. Dimmable track lighting or spotlights positioned behind the hitting area are great options. You can direct them onto your ball and mat without creating glare. When done right, the projected course will feel incredibly real, pulling you right into the game, much like our complete RSG Bundles are designed to do.
Pro Tips for a Longer-Lasting Screen
Your impact screen takes a beating, so choosing a durable material is essential. A standard projector screen won't survive a single golf ball impact. While professional-grade impact screens are the best option, some DIYers have found creative solutions. For a budget-friendly approach, a heavy-duty plain white tablecloth can work temporarily; one user reported theirs lasting about a year with regular use. To prevent tearing when you hang it, try stapling the fabric to a 2x2 piece of wood before attaching your bungees or ties. This distributes the tension evenly and helps your screen last much longer, letting you focus on improving your game with one of our golf simulators.
Related Articles
Frequently Asked Questions
Can I just use a regular projector screen or a bedsheet instead of a special impact screen? I know it's tempting to try and save a few bucks here, but a standard projector screen or sheet will tear almost immediately. They aren't designed to handle the force of a golf ball. A proper impact screen is made from a multi-layer, durable fabric that absorbs the ball's energy safely, prevents dangerous bounce-back, and also provides a much better surface for a crisp, bright image.
How much space do I really need behind my impact screen? You should leave at least one foot of open space between your impact screen and the wall behind it. This gap is crucial because it gives the screen room to flex when the ball hits it. Without that space, the screen would slam against the wall, which not only creates a loud noise but also causes the ball to rebound too quickly and can damage both your screen and your wall over time.
What's the most common mistake people make when building a DIY screen? The biggest mistake is getting the tension wrong. Many people stretch the screen as tight as a drum, thinking it will create a better picture. In reality, this makes the screen loud on impact, causes the ball to ricochet back dangerously, and puts too much stress on the grommets and fabric. The goal is a smooth, flat surface with just enough give to absorb the ball's energy quietly and safely.
My screen has some wrinkles. How do I get it perfectly flat? Wrinkles are almost always a sign of uneven tension. The best way to fix this is to work your way around the frame, making small, gradual adjustments to your bungees or zip ties. Loosen the bungees in the areas opposite the wrinkles and slightly tighten the ones in the wrinkled areas. It's a bit of a trial-and-error process, but taking the time to get the tension balanced across the entire screen will give you that perfectly smooth surface.
Is it really worth the effort to build my own screen, or should I just buy a complete kit? Building your own screen can be a really rewarding project, especially if you enjoy DIY work and have a unique space that requires a custom fit. It gives you total control over the size and materials. However, if you want to get up and running quickly without the hassle of sourcing parts and building from scratch, a complete simulator bundle is a fantastic option. It ensures all the components are designed to work together perfectly for safety and performance right out of the box.