The biggest mistake you can make with a home golf simulator isn't choosing the wrong tech—it's misjudging your space. "Is my 9-foot ceiling high enough?" "Can I really swing a driver in my garage?" A few inches can be the difference between a confident, powerful swing and a cramped, hesitant one. This guide provides the clear, straightforward simulator room dimensions you need to get it right from the start. We'll cover the exact measurements for height, width, and depth, including golf simulator room dimensions metric conversions, so you can build a setup that truly fits your game.
Principaux enseignements
- Test Your Swing Arc First: Before buying anything, grab your driver and take a few slow practice swings in your intended space. This real-world test is the best way to confirm you have at least 10 feet of ceiling height for a comfortable, unrestricted swing.
- Map Out the Entire Footprint: A great setup needs more than just swing clearance. Plan for at least 18 feet of depth to allow for a safe buffer behind the screen and accurate shot tracking, and 15 feet of width to accommodate both right- and left-handed players.
- A Perfect Room Isn't Required: If your space is smaller than the ideal, you can still build an amazing setup. Prioritize equipment designed for compact areas, consider a retractable screen for a multi-purpose room, or focus on creating a world-class short-game practice station.
What Are the Ideal Golf Simulator Room Dimensions?
Figuring out your ideal room setup is the first step toward bringing the course into your home. Before you start picking out equipment, you need to know if you have enough room to swing freely and safely. The right space ensures you can take a full, confident swing with every club in your bag, from your wedge to your driver. Let’s walk through the exact dimensions you’ll need to create a golf simulator room that works for you.
What's the Absolute Minimum Room Size?
To get the best experience, you need a room that gives you enough clearance on all sides. Think of these as the baseline dimensions for a comfortable and functional setup. For a space that accommodates both right- and left-handed players without anyone feeling cramped, aim for a room that is at least 10 feet high, 15 feet wide, and 18 feet deep. The height is crucial for ensuring your club, especially your driver, doesn't hit the ceiling on your backswing. The width gives you a safe buffer from side walls, and the depth provides enough distance between you and the screen for accurate shot tracking.
Tiered Room Size Recommendations
Not every room is the same, and your ideal setup will depend on your space and your goals. Think of these tiers as a guide to help you match your room to your dream simulator. Whether you're working with a tight corner in the garage or a spacious, dedicated bonus room, there's a configuration that will work for you. Let's look at a few common scenarios to help you find the perfect fit.
The Essentials: Minimum Viable Space
For a solid, functional setup that works for just about everyone, you'll want to stick to the minimums. Think of this as your starting point. You'll need a room that is at least 10 feet high, 15 feet wide, and 18 feet deep. This gives you enough ceiling clearance to swing your driver without worry, while the width provides a safe buffer and easily accommodates both right- and left-handed golfers. The depth is also important, as it gives your launch monitor enough space to accurately track the ball's flight. As the team at Rain or Shine Golf points out, this height is the most critical factor for a comfortable swing.
The Comfort Zone: A More Relaxed Setup
If you have a bit more space to work with, you can create an even more comfortable and immersive experience. For this setup, aim for a room that’s 10 to 11 feet high, over 15 feet wide, and between 18 and 25 feet deep. That extra foot of height can make a big difference in how free your swing feels, and the added width and depth give you more room for seating, a computer stand, or just a more open, less-cramped environment. This extra breathing room helps make your simulator feel less like a practice tool and more like a dedicated entertainment space. It's a recommendation echoed by experts like Carl's Place, who know that a little extra space goes a long way.
The Sweet Spot: A Compact, Immersive Experience
Now, what if your room is a little more compact? You can still create an amazing setup. Some find the sweet spot for a dedicated, single-player space is around 9 feet high, 12 feet wide, and 16 feet long. While 10 feet of height is the gold standard for peace of mind, a 9-foot ceiling can work for many golfers—just be sure to take those slow practice swings with your driver to confirm your clearance. This more contained footprint can feel incredibly immersive, as the screen fills more of your field of view. It’s a great reminder that you don’t need a massive room to build a high-quality simulator, especially with flexible systems designed for various spaces.
The Pro Setup: Advanced Configuration
For those building a top-tier, performance-focused simulator, the overall room size is just one part of the equation. You also need to consider the specific placement of your gear. Plan for about 12 to 16 inches of space between your impact screen and the back wall to prevent dangerous ricochets and protect the screen. You should also be hitting from 10 to 12 feet away from the screen for the best image quality and accurate readings. Finally, make sure you have at least 7 feet of space behind you for an uninterrupted backswing. Nailing these details is what separates a good setup from a great one. If you're diving this deep, it can be helpful to talk with an expert to fine-tune your layout.
Quick Guide: Imperial to Metric Conversions
If you think in meters instead of feet, here are the ideal dimensions to keep in mind. A great golf simulator room should have a ceiling height of at least 3 meters (about 10 feet). For width, you’ll want 4 meters (about 13 feet) or more to swing without worry. Finally, a depth of 5 to 6 meters (about 16 to 20 feet) gives your launch monitor plenty of room to accurately capture ball flight and provides a safe distance from the screen. These measurements give you a solid foundation for building your own golf room and creating a setup that feels just right.
How Simulator Types Affect Your Space Needs
The type of launch monitor you choose can also influence your space requirements. Radar-based systems, for example, often need more room depth to accurately track the ball after it leaves the clubface. They typically require about 8 feet from the monitor to the ball and another 10 feet from the ball to the screen. On the other hand, camera-based systems can measure ball data almost instantly, meaning they often work well in rooms with less depth. As you explore different launch monitors, keep your room’s dimensions in mind to find a system that’s a perfect match for your space.
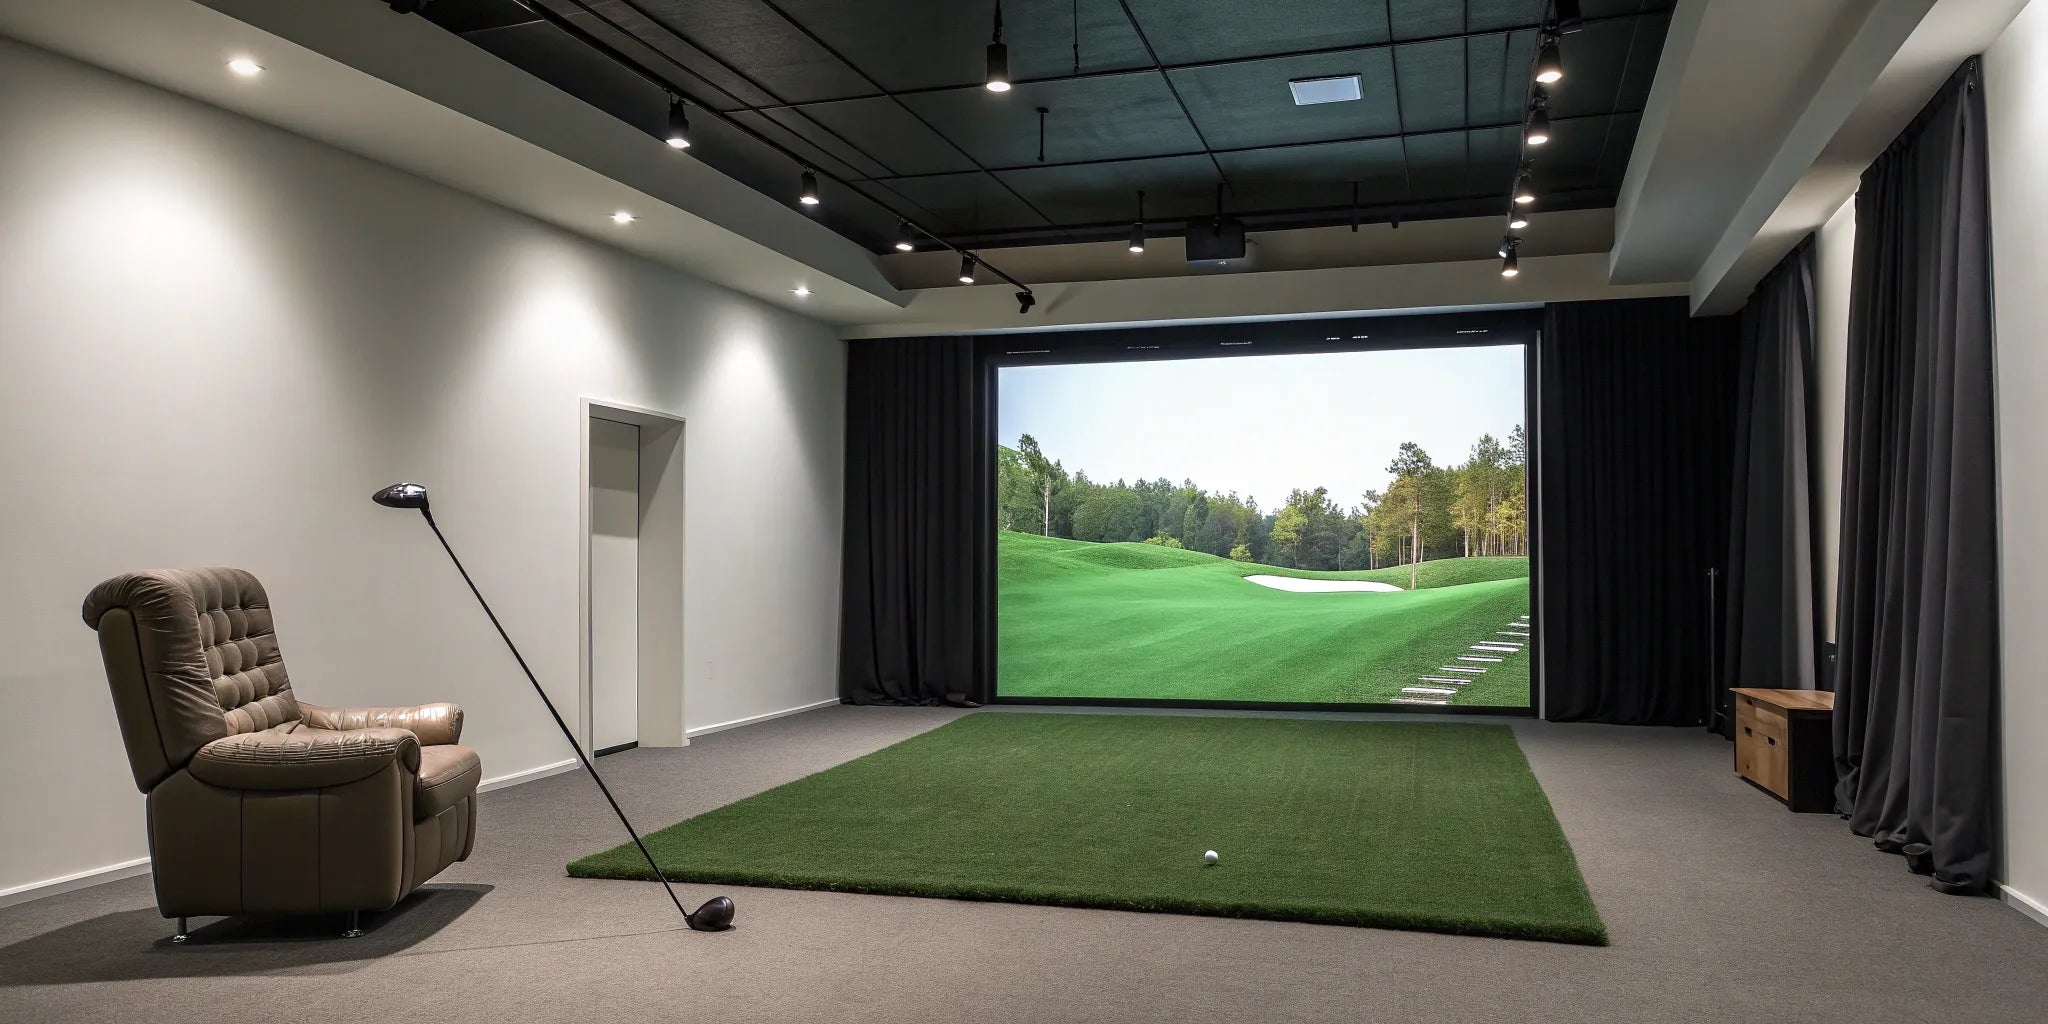
Sizing for an Immersive Screen Experience
To truly feel like you're standing on the first tee at your favorite course, you’ll want a screen that fills your field of view. This is what creates that immersive feeling. For a large impact screen, think in the range of 160 to 200 inches, you'll need a room that's at least 9 to 10 feet high and 12 to 16 feet wide. The depth is just as important, with about 18 feet being the sweet spot. This allows for about a foot of space behind the screen to absorb impact, 10 to 12 feet from the tee to the screen, and enough room behind you for a full, comfortable swing. Getting these measurements right is key when designing your setup, as it ensures the picture is big and bright without compromising safety or performance.
Is Your Ceiling High Enough for a Golf Simulator?
Of all the measurements for your golf simulator room, ceiling height is arguably the most important. It’s the one dimension you can’t easily change, and it directly impacts your ability to swing freely and confidently. A ceiling that’s too low can lead to damaged clubs, a damaged ceiling, or worst of all, a hesitant swing that messes with your mechanics. Getting this right from the start is the key to creating a practice space you’ll love to use. The goal is to be able to take a full, powerful swing with your driver without a second thought. Let's walk through how to figure out the perfect height for your setup.
How to Find Your Perfect Ceiling Height
The general rule of thumb for a comfortable and safe golf simulator setup is a ceiling height of at least 10 feet (about 3 meters). This height provides enough clearance for most golfers to complete a full swing with their longest club without feeling cramped or worrying about impact. It accommodates the upward arc of the club and gives you the peace of mind to swing naturally. If you’re starting with an unfinished space like a basement or garage, aiming for that 10-foot mark is a great goal as you build your golf room.
Does Your Height Affect the Room Size?
Absolutely. Your physical height and the length of your arms play a significant role in determining the necessary ceiling clearance. A taller person will naturally have a wider and higher swing arc, requiring more vertical space than a shorter person. If your ceiling is under the recommended 10 feet, you aren’t completely out of luck. You may just have to adjust your practice routine. While you might not be able to comfortably swing your driver, you can still get plenty of quality practice in with your irons and wedges, which require less vertical space.
Don't Forget to Measure Your Swing Arc
The best way to know for sure if your ceiling is high enough is to test it yourself. Grab your longest club (usually your driver) and stand in the spot where you plan to hit. Take a few slow, deliberate practice swings. Pay close attention to the top of your backswing and your follow-through. Do you feel any hesitation? Are you subconsciously shortening your swing to avoid the ceiling? Taller players or those with a more upright swing plane might find they need even more than 10 feet. This simple test is the most reliable way to confirm you have the space you need to swing without restriction.
Remember to Stand on Your Hitting Mat
When you’re testing your swing arc, there’s one small but critical detail that’s easy to forget: the hitting mat. You won't be swinging from the bare floor, and a quality golf mat can add two or three inches to your height. In a room with a 10-foot ceiling, losing those few inches can be the difference between a free, confident swing and a clipped, hesitant one. It’s a tiny detail that has a major impact on your entire experience, so it’s important to account for it before you commit to a space or purchase any equipment.
To get an accurate feel for your space, find an object that’s roughly the same height as the hitting mat you plan to use—a thick book or a sturdy piece of wood works well. Place it on the floor where you intend to hit, stand on it, and then take those slow, deliberate practice swings with your driver. This simple step gives you a true measurement of your available headroom and ensures there are no surprises once you build your golf room. It’s the best way to confirm your space will work perfectly from day one.
Why You Need a Safety Buffer Zone
Your swing isn't the only thing that needs vertical space. Your simulator equipment, particularly the enclosure and impact screen, also requires clearance. It’s crucial to leave at least one foot of buffer space between the top of your screen enclosure and the ceiling. This gap prevents the enclosure from hitting the ceiling from the force of a golf ball hitting the screen and also allows for proper tensioning. This buffer zone is a non-negotiable part of a safe setup, ensuring your equipment functions correctly and your room stays protected. If you have questions about your specific room, you can always contact an expert for guidance.
Mapping Out Your Room's Width and Depth
Once you’ve confirmed your ceiling is high enough, the next step is to map out the floor plan. The depth and width of your room determine not only how comfortably you can swing but also how immersive your experience will be. You need enough space to swing freely, keep a safe distance from the screen, and allow for foot traffic and seating. Let's break down the ideal dimensions for your simulator's footprint.
What's the Standard Room Depth?
For a great setup, aim for a room depth of about 18 feet (5.5 meters). This might sound like a lot, but it accounts for three key zones. First, you’ll want about 12-16 inches (30-40 cm) of space between your impact screen and the wall behind it. This buffer prevents the screen from hitting the wall and allows it to absorb the ball's impact properly. Next, you need 10-12 feet (3-4 meters) from the tee to the screen. Finally, leave at least 7 feet (about 2 meters) behind the tee for your backswing and to create a safe, open area. These measurements ensure you have a comfortable space to play without feeling cramped.
Key Distances to Remember
When you're planning your setup, it helps to have a quick checklist of the most important numbers. For ceiling height, you'll want a minimum of 10 feet (about 3 meters). This is the magic number that allows you to take a full, confident swing with your driver. For width, aim for at least 15 feet to comfortably fit both right- and left-handed players without anyone feeling boxed in. Finally, a room depth of 18 feet (5.5 meters) gives you a safe buffer and ensures your launch monitor can accurately track every shot. Don't forget to leave at least one foot of space between the top of your screen enclosure and the ceiling to prevent any damage. Following these guidelines will help you build a golf room that's both safe and fun to use.
How Wide Should Your Room Be for a Full Swing?
To swing your club without worrying about hitting a wall, you’ll need a minimum room width of 9 to 10 feet (2.7 to 3 meters). This gives a single right- or left-handed golfer enough clearance for a full, natural swing. Before you commit, I always recommend taking a few slow practice swings with your driver in the actual space to see how it feels. Make sure you have plenty of elbow room on all sides. This simple test will help you confirm that your chosen room is wide enough for you to practice your swing with confidence.
Offsetting the Tee in Narrow Rooms
If your room is on the narrower side—closer to that 10-foot minimum—you don't have to give up on your dream setup. This is where a simple but effective strategy called offsetting the tee comes into play. Instead of placing your hitting mat in the dead center of the room, you just shift it to one side. For a right-handed player, this means moving the mat toward the right wall. This small change creates a ton of extra clearance for your backswing and follow-through, so you can swing your driver with confidence. It’s a smart trick that lets you customize your setup for a tighter space without sacrificing your natural swing.
Planning for Guests and Multiple Players
If you plan on inviting friends over or have both right- and left-handed golfers in your family, you’ll need a wider room. To comfortably accommodate players on both sides of the ball, you should plan for a width of at least 14 feet 9 inches (4.5 meters). This extra space ensures that no one has to adjust their swing or worry about hitting a wall, regardless of their dominant hand. Having a wider setup makes your simulator room more versatile and welcoming for everyone. It's a key factor when you're looking at different simulator bundles designed for group play.
Creating a Clear Path to Walk and Play
Your golf simulator setup is more than just the hitting area; it’s the entire room. To keep the space functional and safe, leave at least 6.5 feet (2 meters) of open space around the hitting mat. This buffer zone is perfect for creating a small lounge area with chairs, a table for drinks, or a spot for your golf bags. It ensures people can walk around safely without getting in the way of a swing. Thinking about this extra space is a big part of the process when you start to customize your golf room and turn it into the ultimate entertainment spot.
Finding the Right Spot for All Your Gear
Once you’ve confirmed your room has the right dimensions, it’s time to think about where everything will go. The placement of your equipment is just as important as the size of your space because it directly affects gameplay, safety, and the overall flow of your room. Each component, from the launch monitor to your impact screen, has its own spatial needs. Planning this layout ahead of time prevents headaches later and ensures you get the most out of every swing.
Think of this as designing your perfect golf sanctuary. You’ll need to position the launch monitor for accurate readings, set up your screen and projector for an immersive view, and install impact protection to keep your walls (and yourself) safe. You should also consider practical elements like storage for your clubs and seating for friends. A well-organized space not only looks better but also makes your practice sessions more efficient and enjoyable. Taking the time to map out your equipment will transform an empty room into a functional and professional-grade golf simulator setup. If you're starting from scratch, our simulator bundles package the core components together to simplify the process.
Where Should Your Launch Monitor Go?
The launch monitor is the technological heart of your simulator. It’s the device that captures all the critical data from your swing—like ball speed, launch angle, and spin—to give you accurate, realistic feedback. Where you place it is essential for getting reliable data. Some launch monitors sit beside the hitting area, while others are placed behind the golfer.
Always check the manufacturer’s recommendations for your specific model to find the sweet spot. The right placement ensures the monitor’s cameras or radar can clearly see the ball at impact, giving you the precise analytics you need to improve your game. Our line of launch monitors offers different options to fit various room layouts and preferences.
Placement Needs for Popular Launch Monitors
Let's break down the placement for the two main types of launch monitors: radar-based and camera-based. Radar units typically sit about 8 feet behind the hitting area and require significant room depth to accurately track the ball. They follow the ball's flight for a longer distance, so you'll need at least 10 more feet from the ball to the screen for reliable readings. On the other hand, camera-based systems are usually placed beside the golfer. They capture ball data almost instantly at impact, making them a fantastic option for rooms with less depth. This is why checking the manufacturer's specs for your specific model is so important—it ensures you find the perfect fit for your space and get the reliable data you need.
Setting Up Your Screen and Projector
Your impact screen and projector work together to bring the virtual course to life. For a truly immersive experience, you want a crisp, clear image that fills the screen. This means mounting your projector at the correct distance and angle to avoid casting shadows from your body or club during your swing.
The impact screen is typically the first piece of equipment you’ll place, as it defines the front of your playing area. Once it’s in position, you can work backward to set up your hitting mat and other components. Getting the screen and projector alignment right is key to making you feel like you’re really standing on the fairway.
Why a Short Throw Projector is Often Best
For most golf simulator setups, a short throw projector is your best bet. Its main advantage is that it eliminates the annoying shadow of your body and club on the screen. Because it can be mounted closer to the impact screen—often overhead and just behind the tee area—you won't block the light as you swing. This is key for maintaining an immersive experience, since a silhouette dancing on the screen can really pull you out of the game. This close placement is also incredibly space-efficient, making it a perfect solution if your room isn't as deep as you'd like. You can still get a massive, wall-to-wall image without needing 20 feet of depth, because these projectors are designed to create a big picture from a short distance.
Where to Add Impact Protection
Safety is a top priority when setting up your simulator. Your impact screen will absorb the force of most shots, but you need to plan for the occasional miss-hit. First, leave about 30 centimeters (or one foot) of space between your impact screen and the back wall. This buffer prevents the screen from smacking into the wall and allows it to flex properly, extending its lifespan.
You also need to protect the walls and ceiling around your hitting area. Consider adding side netting or padded wall panels to contain any stray shots. This is especially important if you plan on having friends over to play. You can build your golf room with custom safety features to ensure your space is fully protected.
Don't Forget About Storage Space
A cluttered space can distract from your practice, so planning for storage is a smart move. Think about where you’ll keep your clubs, balls, and other accessories when they’re not in use. A simple club rack, some wall-mounted shelving, or a small cabinet can keep your equipment organized and out of the way.
This also helps create a more polished and inviting environment. Adding a small bench or a couple of chairs gives you and your guests a comfortable place to sit between shots. A well-designed room makes the experience better for everyone. If you need ideas on how to best organize your space, don't hesitate to contact an expert for personalized advice.
Planning Around Common Component Sizes
Instead of starting from scratch with fully custom dimensions, it can be much easier to plan your room around the standard sizes of key components like impact screens and hitting mats. Most golf simulator equipment is manufactured in common sizes, which simplifies the shopping process and often keeps costs down. By knowing these typical dimensions ahead of time, you can map out your space with confidence, ensuring that the gear you buy will fit perfectly without any awkward gaps or tight squeezes. This approach helps you visualize the final layout and makes it easier to customize your golf room with components that are designed to work together seamlessly.
Standard Impact Screen Sizes
Impact screens come in a range of standard sizes to fit different rooms. Generally, you’ll find screens that are between 9 and 16 feet wide and 5 to 10 feet tall. For a great balance of immersion and practicality, most home setups use a screen that is 10 to 12 feet wide and 7 to 9 feet high. This size provides a fantastic viewing area that fills your field of vision without requiring a cavernous space. When choosing, try to match the screen's aspect ratio to your room's dimensions to create the most realistic and visually appealing setup. Our simulator bundles include high-quality screens designed to fit these popular dimensions perfectly.
Typical Hitting Mat Dimensions
Your hitting mat is the foundation of your practice area, and it also comes in a few common sizes. The most popular options are square mats, typically 5'x5', and rectangular ones, often 4'x7' or 5'x10'. A 5'x5' mat is a fantastic choice because it allows both right- and left-handed golfers to play without having to shift the mat. Larger rectangular mats give you more room to stand and can accommodate different tee positions. For a truly premium look, you can also opt for a full flooring solution that combines the hitting strip with surrounding turf, creating a seamless, professional finish for your entire simulator bay.
Nailing the Technical Setup
Once you’ve confirmed your room has enough space, it’s time to think about the technical details that turn a good setup into a great one. These elements—ventilation, lighting, power, and sound—are often overlooked but are crucial for creating a comfortable and functional environment where you can truly lose yourself in the game. Getting these right from the start saves you from headaches later and ensures every session is enjoyable. Think of it as setting the stage for your performance; the right atmosphere can make all the difference.
Planning these technical aspects doesn't have to be complicated. It’s about considering how you’ll use the space and what you need to feel comfortable. Will you be playing for hours? You’ll want good airflow. Do you want the graphics to look crisp and clear? Proper lighting is key. And you’ll definitely need a reliable power source and internet connection to run the system smoothly. If you’re feeling a bit overwhelmed by the details, remember you can always contact an expert to walk you through the process and help you design the perfect space for your needs.
Does Your Room Have Enough Airflow?
A golf swing is a full-body workout, and you’d be surprised how quickly a closed room can get warm and stuffy, especially during a long practice session. Good ventilation is essential for comfort. It keeps the air fresh and the temperature regulated, so you can focus on your game instead of feeling overheated. A simple standing fan or an open window can make a big difference. If your simulator is in a garage or basement, consider how you can create some airflow. Integrating the room into your home’s existing HVAC system is an ideal solution for consistent climate control.
How to Get Your Simulator Lighting Just Right
Lighting is a balancing act in a simulator room. You need enough light to see your surroundings and equipment clearly, but you want to avoid creating glare on your impact screen, which can wash out the projector’s image. Track lighting with dimmable LED bulbs is a popular and effective solution, as it allows you to direct light where you need it while keeping it off the screen. Also, consider your projector’s “throw distance”—the distance it needs to be from the screen to project a clear, properly sized image. This detail is critical for a sharp, immersive display when you customize your golf room.
Planning for Power Outlets and Wi-Fi
Your golf simulator is a hub of technology, and it all needs power. You’ll need conveniently located outlets for your launch monitor, computer or tablet, projector, and any additional lighting or fans. Plan to have more outlets than you think you need to avoid a tangle of extension cords. A stable internet connection is also vital for software updates, online tournaments, and accessing all the features of your system. While a strong Wi-Fi signal often works, a hardwired ethernet connection provides the most reliable performance. Be sure to check the specific power and connectivity requirements for the launch monitors you’re considering.
How to Handle Room Acoustics and Sound
The sound of a driver making contact with a golf ball is satisfying on the course, but it can be surprisingly loud indoors. If your simulator is in a shared living space, a garage attached to the house, or a basement bedroom, managing the noise is a must. Sound can travel easily through walls and floors, so consider adding sound-dampening materials. Acoustic foam panels, heavy curtains, or even thick rugs can absorb a significant amount of noise. Our complete simulator bundles include full enclosures that also help contain sound, making your practice sessions more pleasant for everyone in the house.
Designing Your Ideal Golf Simulator Room
Once you have the technical components sorted out, it’s time for the fun part: turning a functional space into your personal golf sanctuary. The right environment does more than just house your simulator; it makes every session more immersive, comfortable, and enjoyable. Think of it as your home course—a place you genuinely look forward to spending time in. From the ground you stand on to the air you breathe, every detail contributes to the overall experience. A well-designed room helps you focus on your swing and get the most out of your practice.
Creating the perfect playing environment involves four key areas. First, you need to design a hitting area that gives you the confidence to swing freely. Next, choosing the right flooring adds a layer of realism that connects you to the game. You’ll also want to consider climate control to ensure your room is a comfortable, year-round retreat. Finally, making sure your equipment is well-organized and easily accessible means you can spend less time setting up and more time playing. Let’s walk through how to get each of these elements just right.
Creating the Perfect Hitting Zone
Your hitting area is the heart of your simulator room, and its design is all about giving you enough space to swing without hesitation. For a comfortable setup, a good rule of thumb is to aim for a room that is at least 10 feet high, 14 feet wide, and 18 feet deep. These dimensions aren't arbitrary; they ensure you have enough clearance for a full, unrestricted swing with every club, including your driver. A spacious hitting area allows you to focus on your form instead of worrying about hitting a wall or ceiling, creating a more relaxed and effective practice environment. If you're unsure how to measure your space, a detailed guide can help you get started.
What's the Best Flooring for a Golf Simulator?
The surface you stand on can make a huge difference in how realistic your simulator feels. While you can hit off a standard mat, upgrading your flooring can completely transform the experience. High-quality artificial turf or a specialized hitting strip can mimic the feel of a real fairway or tee box, adding a satisfying touch of authenticity to every shot. This not only enhances immersion but also provides a more forgiving surface for your joints. When you build your golf room, think about how the right flooring can make your indoor setup feel just like you're out on the course.
Keeping Your Room Comfortable with Climate Control
One of the best parts of having an indoor golf simulator is the ability to play anytime, regardless of the weather. To make your space a true year-round escape, climate control is essential. A comfortable, temperature-controlled room allows you to practice for hours without feeling too hot in the summer or too cold in the winter. Proper heating, ventilation, and air conditioning (HVAC) also protect your sensitive electronic equipment from extreme temperatures and humidity. By maintaining a consistent climate, you create a pleasant environment where you can fully concentrate on your game and enjoy every session.
Making Sure Your Gear is Always Within Reach
A well-organized room is an efficient one. When planning your layout, think about how you’ll access your clubs, balls, and other accessories. A cluttered space can be distracting and make it harder to get into the flow of your practice. Consider adding simple storage solutions like a golf bag stand, wall racks for your clubs, or a small cabinet for accessories. Having everything in its place makes your room look clean and professional, and it ensures you can grab what you need without interrupting your session. If you need help planning a functional layout, you can always contact an expert for personalized advice.
Working with a Smaller Space?
Don’t let a smaller room stop you from building your dream golf setup. With a bit of smart planning, you can create an incredible golf simulator experience in a space you might have thought was too tight. It’s all about working with what you have and making strategic choices to maximize every inch. You might need to make a few compromises, but a compact setup doesn't mean you have to sacrifice performance or fun.
Whether you're looking at a spare bedroom, a corner of the basement, or a section of your garage, there are clever ways to make it work. From choosing the right equipment to thinking creatively about your layout, you can design a functional and enjoyable space for year-round practice. Let's walk through some practical ideas for designing a golf simulator room when space is at a premium.
Smart Ideas for Smaller Rooms
When you're working with limited dimensions, the key is to be realistic about your setup. For example, if your ceiling height is around 2.4 meters (about 8 feet), you might not be able to comfortably swing your driver. That’s okay! You can still have a fantastic setup for practicing with your irons and wedges. A compact room is perfect for dialing in your short game. Choosing one of our space-efficient launch monitors is a great first step, as they require minimal floor space while still delivering precise data on every shot you take.
Understanding the Limitations of Small Rooms
It's important to be realistic about what a smaller room can handle. The biggest limitation is usually ceiling height; if you're working with less than 10 feet, you'll likely have to skip the driver. Width is another key factor. A room under 15 feet wide can feel tight, especially if you plan to host both right- and left-handed players. You might need to offset your hitting mat to one side, which can limit the versatility of your space. Finally, a shorter room depth can impact the type of launch monitor you choose and reduce the safety buffer between you and the screen. Knowing these trade-offs upfront helps you make smarter decisions and build your golf room to perfectly match your space, even if it means creating a world-class iron practice station instead of a full-swing setup.
Could a Retractable System Work for You?
A retractable impact screen is one of the best solutions for a smaller, multi-purpose room. This allows you to transform your space from a golf haven back into a living area, home gym, or media room with ease. When planning for any screen, it’s best to have at least 3 meters (about 10 feet) of ceiling height for a comfortable swing, though some golfers can make 2.5 meters (about 8 feet) work. Remember to leave about 30 centimeters (1 foot) of space behind the screen for safety and to absorb impact. A retractable system gives you the flexibility to enjoy your game without permanently dedicating the entire room to it.
How to Design a Multi-Purpose Simulator Room
If your simulator needs to share space, thoughtful design can make all the difference. Think about creating a cohesive look that blends the golf setup with the room's other functions. Using the same flooring throughout the entire room, for instance, can make the space feel larger and more integrated. You can also use clever storage solutions, like cabinets or wall-mounted racks, to keep your golf equipment tidy when not in use. When you customize your golf room, you can plan for these elements from the start, ensuring your simulator feels like a natural part of your home.
Using a Corner for Your Simulator Setup
Is your room more narrow than it is wide? Don't count it out. An offset or corner installation can be a brilliant way to utilize the space. Instead of centering your hitting mat and screen, you can shift the entire setup to one side of the room. This opens up the remaining area for foot traffic and gives you the necessary clearance for your backswing. It’s an unconventional approach that works surprisingly well in challenging layouts. If you're unsure how to map out a corner setup, you can always contact an expert on our team for personalized advice.
Advice for Oddly Shaped Rooms
Not every potential simulator space is a perfect box. You might be dealing with an L-shaped basement, a bonus room with a sloped ceiling, or a garage with support columns right in the middle. The key is to work with your room's unique features, not against them. For a sloped ceiling, the solution is simple: position your hitting mat directly under the highest point to give yourself maximum vertical clearance. For other obstructions like beams or columns, map out your swing arc carefully to ensure they are well outside your hitting zone. A little creative layout planning can turn an awkward space into a perfectly functional golf setup. The goal is to build your golf room around its quirks, ensuring a safe and enjoyable experience.
Putting Safety First in Your Simulator Setup
Once you’ve planned your room, the final step is putting it all together. A proper setup is about more than just performance—it’s about safety. You want to feel confident taking a full swing without worrying about damaging your home or, more importantly, injuring yourself or someone else. Taking a few extra minutes to secure your space properly ensures every session is enjoyable and stress-free. From positioning your gear to installing impact protection, each step plays a role in creating a secure environment where you can focus on your game.
Essential Safety Checks for Your Room
Before you hit your first ball, take a few practice swings with your longest club, usually your driver. You need enough clearance to swing freely without hitting the ceiling or walls. If you can’t comfortably swing your driver, you’ll probably want to later, and a restricted swing can ruin the experience. Make sure the area is completely clear of furniture, decorations, and any other stray items. It’s also a good idea to establish a clear rule with family and pets that when the simulator is in use, the hitting area is a no-go zone.
The Importance of Proper Equipment Placement
Your launch monitor is the brain of your simulator, capturing all the essential data from your swing. Where you place it is critical for both accuracy and safety. Some systems, like our RSG Pro, sit beside the hitting area, while others are positioned behind the player. Placing the unit correctly keeps it out of your swing path and prevents accidental damage. Proper positioning also ensures the sensors can accurately track your club and ball flight, giving you the reliable feedback you need to improve your game.
Never Alter Your Swing to Fit the Space
This might be the most important piece of advice in this entire guide. The whole point of a home golf simulator is to practice and improve the swing you take to the course. If your space is too tight, you might subconsciously shorten your backswing or flatten your swing plane to avoid hitting a wall or the ceiling. This creates a hesitant, unnatural motion that completely defeats the purpose of practicing. A ceiling that’s too low can lead to a hesitant swing that messes with your mechanics, which is the last thing you want when you're trying to get better.
Practicing with an altered swing builds bad muscle memory that can be incredibly difficult to unlearn. Instead of grooving good habits, you’ll be reinforcing bad ones that will hurt your game when you're back on a real course. Your simulator room should be a space where you can swing with 100% confidence, just like you would on the first tee. If you find yourself hesitating, it's a clear sign the space isn't right. It's far better to stick with your irons and wedges than to compromise your driver swing. Wait until you can build your golf room to properly accommodate your full, natural swing.
How to Install the Right Impact Protection
Your impact screen is designed to take a hit, but it needs a little breathing room to do its job. Always leave at least one foot of space between the screen and the wall behind it. This gap allows the screen to flex and absorb the ball's energy, preventing dangerous ricochets and protecting your wall. For added safety, consider a full enclosure with side netting. This creates a secure hitting bay that contains any errant shots, so you can swing with confidence knowing your walls and windows are protected. You can explore different options when you build your golf room.
Simple Installation Rules to Follow
Every simulator is a little different, so your user manual is your best friend during setup. Always read the specific instructions for your launch monitor and enclosure to make sure everything is assembled correctly. Once it’s built, take a few slow, easy practice swings to confirm your clearances one last time. This helps you get a feel for the space before you start swinging at full speed. If you run into any issues or feel unsure about a step, our technical support team is here to help you get it right.
Matching a Simulator to Your Room's Dimensions
Once you have your room measurements, you can start the most exciting part: matching your space to the perfect golf simulator. The dimensions you’ve recorded will guide your decision, ensuring you choose a system that not only fits but also allows for a comfortable and immersive experience. Whether you have a dedicated room or a multi-purpose space, there’s a setup that will work for you. The key is to align your room’s potential with the right equipment.
Different simulators have different footprints. Some systems, like our overhead-mounted RSG Pro, are great for keeping floor space clear, while portable launch monitors like the RSG Mobile offer flexibility for smaller or shared rooms. By understanding your height, width, and depth, you can confidently browse different options and know exactly what will work. This step is all about turning your vision into a reality by finding the hardware that brings your dream golf room to life.
Which Simulators Work Best in Your Space?
For a comfortable and unrestricted experience, the ideal room is about 3 meters high, 4.3 meters wide, and 5.5 meters deep. This gives you plenty of space to swing freely without worrying about hitting a wall or ceiling. If your room meets or exceeds these dimensions, you have the flexibility to choose from a wide range of setups. However, don't worry if your space is a bit smaller. Even with limited room, you can still create an incredible golf simulator experience. The trick is to select a system that’s designed for your specific environment. You can explore our complete collection of golf simulators to find options that fit various room sizes.
Getting Your Room Ready for Installation Day
Before your equipment arrives, get your room ready for a smooth installation. The first and most important step is to confirm you have enough space to safely swing your clubs, especially your driver. Grab your longest club and take a few slow, controlled practice swings in the spot where you plan to hit. This simple test will give you a real-world feel for the space and confirm your measurements. Once you’re confident in your swing area, clear the room of any furniture, decorations, or obstacles that could get in the way. This is also a great time to think about the final layout and customize your room design.
How to Future-Proof Your Setup
When planning your simulator room, think about how you might use the space in the years to come. If you have a larger room, you could eventually add seating for friends, a sound system, or even a small bar area to create the ultimate entertainment spot. Planning for these additions now can save you headaches later. Even in a smaller space, thinking ahead is valuable. You might start with a basic setup and upgrade components over time. Considering things like power outlet placement and network access now will make future enhancements much easier. If you need help planning a setup that can grow with you, don't hesitate to contact an expert for personalized advice.
Articles connexes
- Comment construire un simulateur à domicile adapté à son budget et à son espace
- Garage Golf Simulator : Le guide d'installation ultime
- How to Build a Budget Golf Simulator in 2025
Questions fréquemment posées
What is the single most important measurement for a golf simulator room? Without a doubt, it’s ceiling height. While you can often work around limitations in width or depth by choosing specific equipment or adjusting your layout, a ceiling that’s too low is a fundamental problem you can’t easily fix. It directly impacts your ability to swing your longest clubs freely and confidently. Getting the height right is the first and most critical step to ensuring your setup is both safe and enjoyable.
Can I still set up a simulator if my ceiling is lower than 10 feet? Yes, you absolutely can, but you’ll need to be realistic about how you use the space. With a lower ceiling, you may not be able to take a full, comfortable swing with your driver or woods. However, the room can still be an incredible place to practice your iron and wedge play. A setup focused on your short game can be just as valuable for lowering your scores, so don't let a shorter ceiling stop you from creating a dedicated practice zone.
How can I know for sure if I have enough room to swing my driver? The best way to confirm your space is to test it yourself. Grab your driver and stand in the exact spot where you plan to hit. Take several slow, deliberate practice swings, paying close attention to the top of your backswing and your follow-through. If you feel even the slightest hesitation or find yourself subconsciously shortening your swing to avoid the ceiling or a wall, you need more space. Your body will tell you if the room is too tight.
My room is a bit short on depth. Does that rule out a simulator? Not at all. While a depth of 18 feet is ideal, a shorter room can still work perfectly well, especially if you choose the right technology. Camera-based launch monitors, for example, capture ball data almost immediately at impact and often require less distance between the tee and the screen. This makes them a great fit for rooms where depth is limited. The key is to match your launch monitor to your room's specific dimensions.
Do I need extra space if I want to play with friends or family? If you plan on hosting both right- and left-handed players, you will definitely want a wider room. A width of at least 14 to 15 feet is recommended to comfortably accommodate swings from both sides of the ball without anyone needing to move the hitting mat or launch monitor. This extra space ensures everyone can take their natural swing without feeling cramped or worrying about hitting a side wall, making the experience more fun and inclusive for all your guests.


