


Let's face it: the golf season is just too short. Bad weather and a packed schedule can derail your practice routine fast. A garage golf simulator is the ultimate solution, giving you the freedom to play and practice anytime. But where do you start? This guide breaks the entire process down into simple steps. We’ll cover the essential equipment you need, help you figure out your space requirements, and look at options for every budget. My goal is to prove that building a high-quality, enjoyable simulator is more accessible than you think.
Key Takeaways
- Prioritize Your Space Before Your Wallet: Before you shop for any gear, measure your garage. Confirming you have adequate height (at least 9-10 ft), width (12+ ft), and depth (16+ ft) is the most critical first step to building a safe and functional simulator.
- A Great Simulator is Possible at Any Budget: You don't need a professional-level budget to get a fantastic home golf experience. A functional and enjoyable setup can be built for a few thousand dollars, with options to scale up in quality and features as your commitment grows.
- Focus on the Four Essential Components: Every great simulator is built on four pillars: a launch monitor for accurate data, an impact screen and enclosure for safety, a quality hitting mat to protect your joints, and software to create an immersive experience.
What Makes a Great Garage Golf Simulator?
Turning your garage into a personal golf haven is an exciting project, but it helps to know what you’re getting into first. A great setup isn't just about having the fanciest gear; it's about creating a space that works for you, your swing, and your budget. The right combination of components will give you an immersive experience that feels just like being on the course. Before you start shopping, let's break down the essential parts, the space you'll need, and the technology that powers it all. This will help you make informed choices and build a simulator that you'll love using for years to come.
Your Must-Have Components
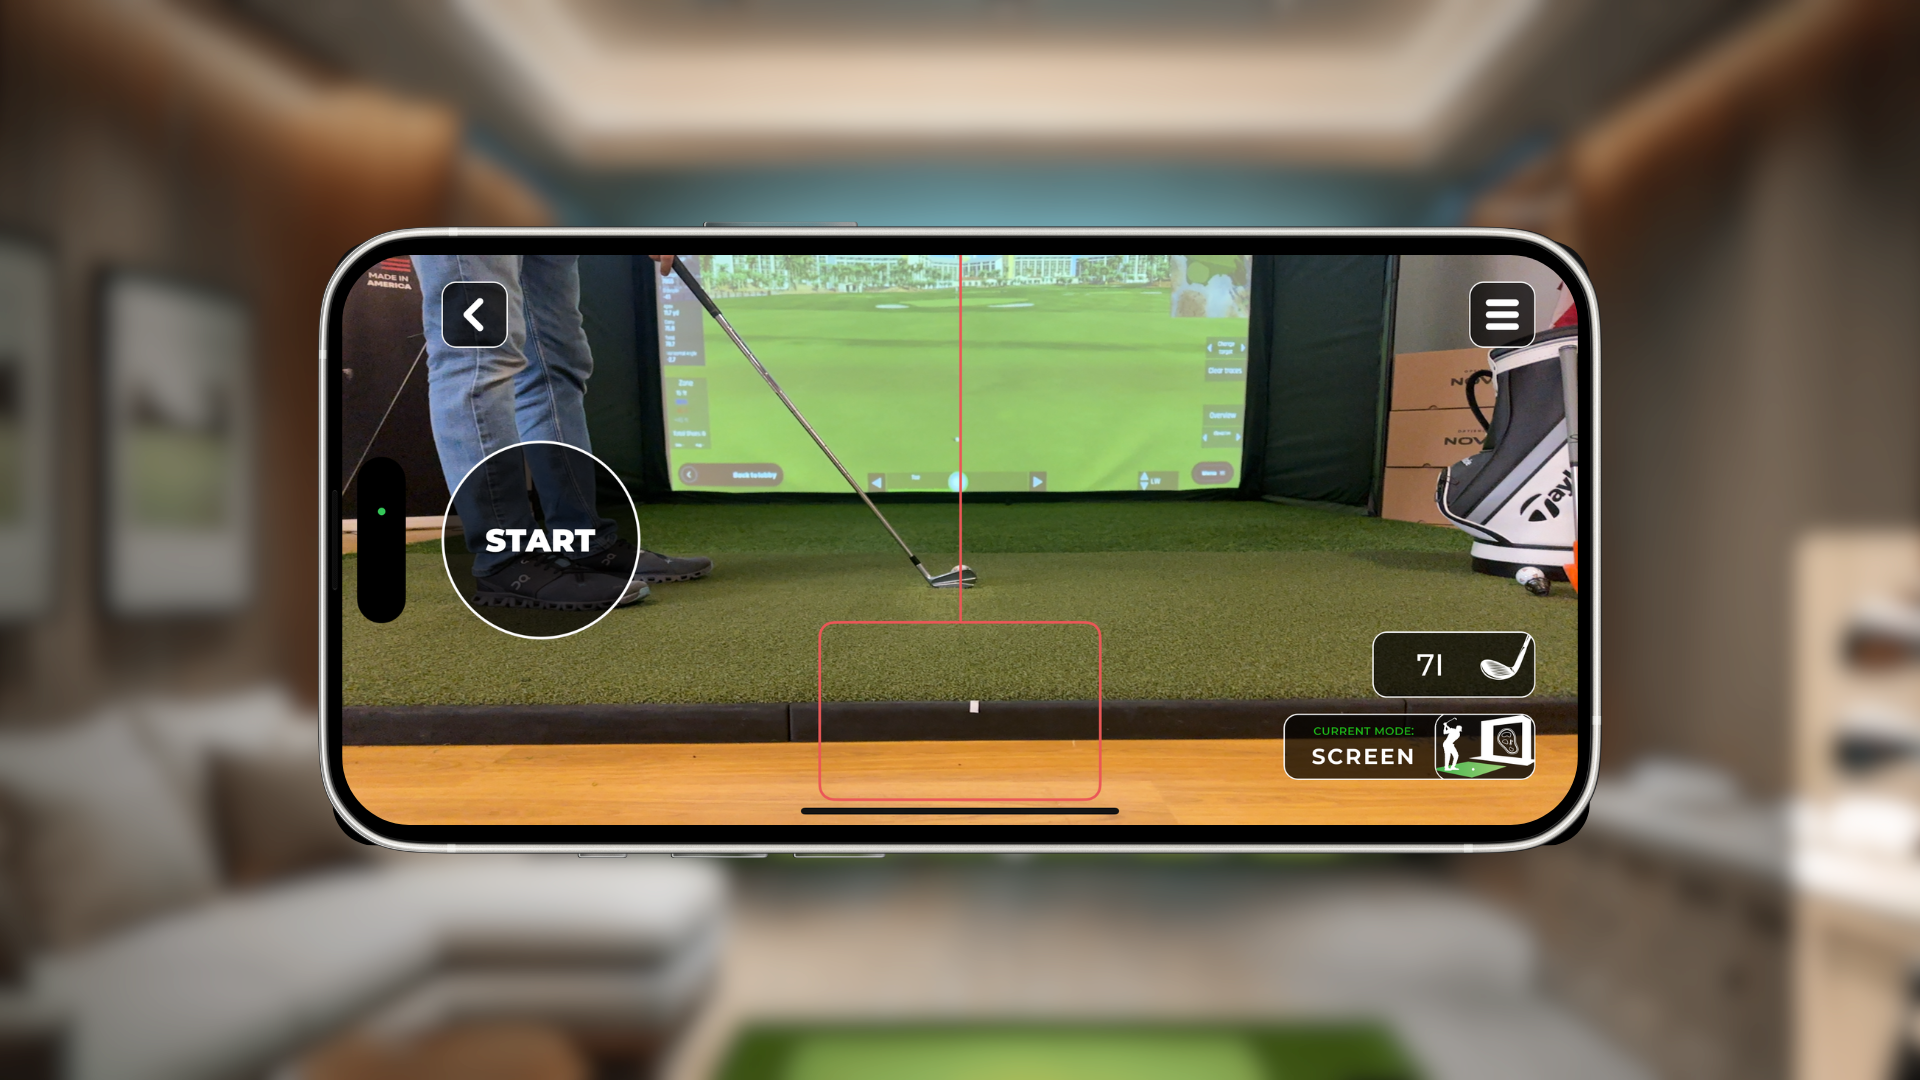
At its core, every garage golf simulator has four main parts that work together. First is the golf enclosure and impact screen, which safely stops your ball and provides the surface for projecting the course. Next, the launch monitor acts as the brains of the operation, using cameras or radar to track your swing and ball flight data. A projector then displays the virtual course onto the impact screen. Finally, a high-quality hitting mat gives you a realistic turf feel and helps protect your joints from the hard garage floor. You can source these items individually or get them all in one of our complete RSG Bundles.
How Much Space Do You Really Need?
This is the number one question people ask, and for good reason. The last thing you want is to set everything up only to find your driver hits the ceiling. Generally, you’ll need a ceiling height of at least 9 feet to comfortably swing a driver, though 10 feet is ideal. For width, aim for at least 10 feet to give you some wiggle room and center the hitting area. The depth should be around 15-20 feet to allow space for the screen, the mat, and you. Always measure your space before you buy anything. If you have specific questions about your garage dimensions, you can always contact an expert on our team for advice.
How Does the Technology Work?
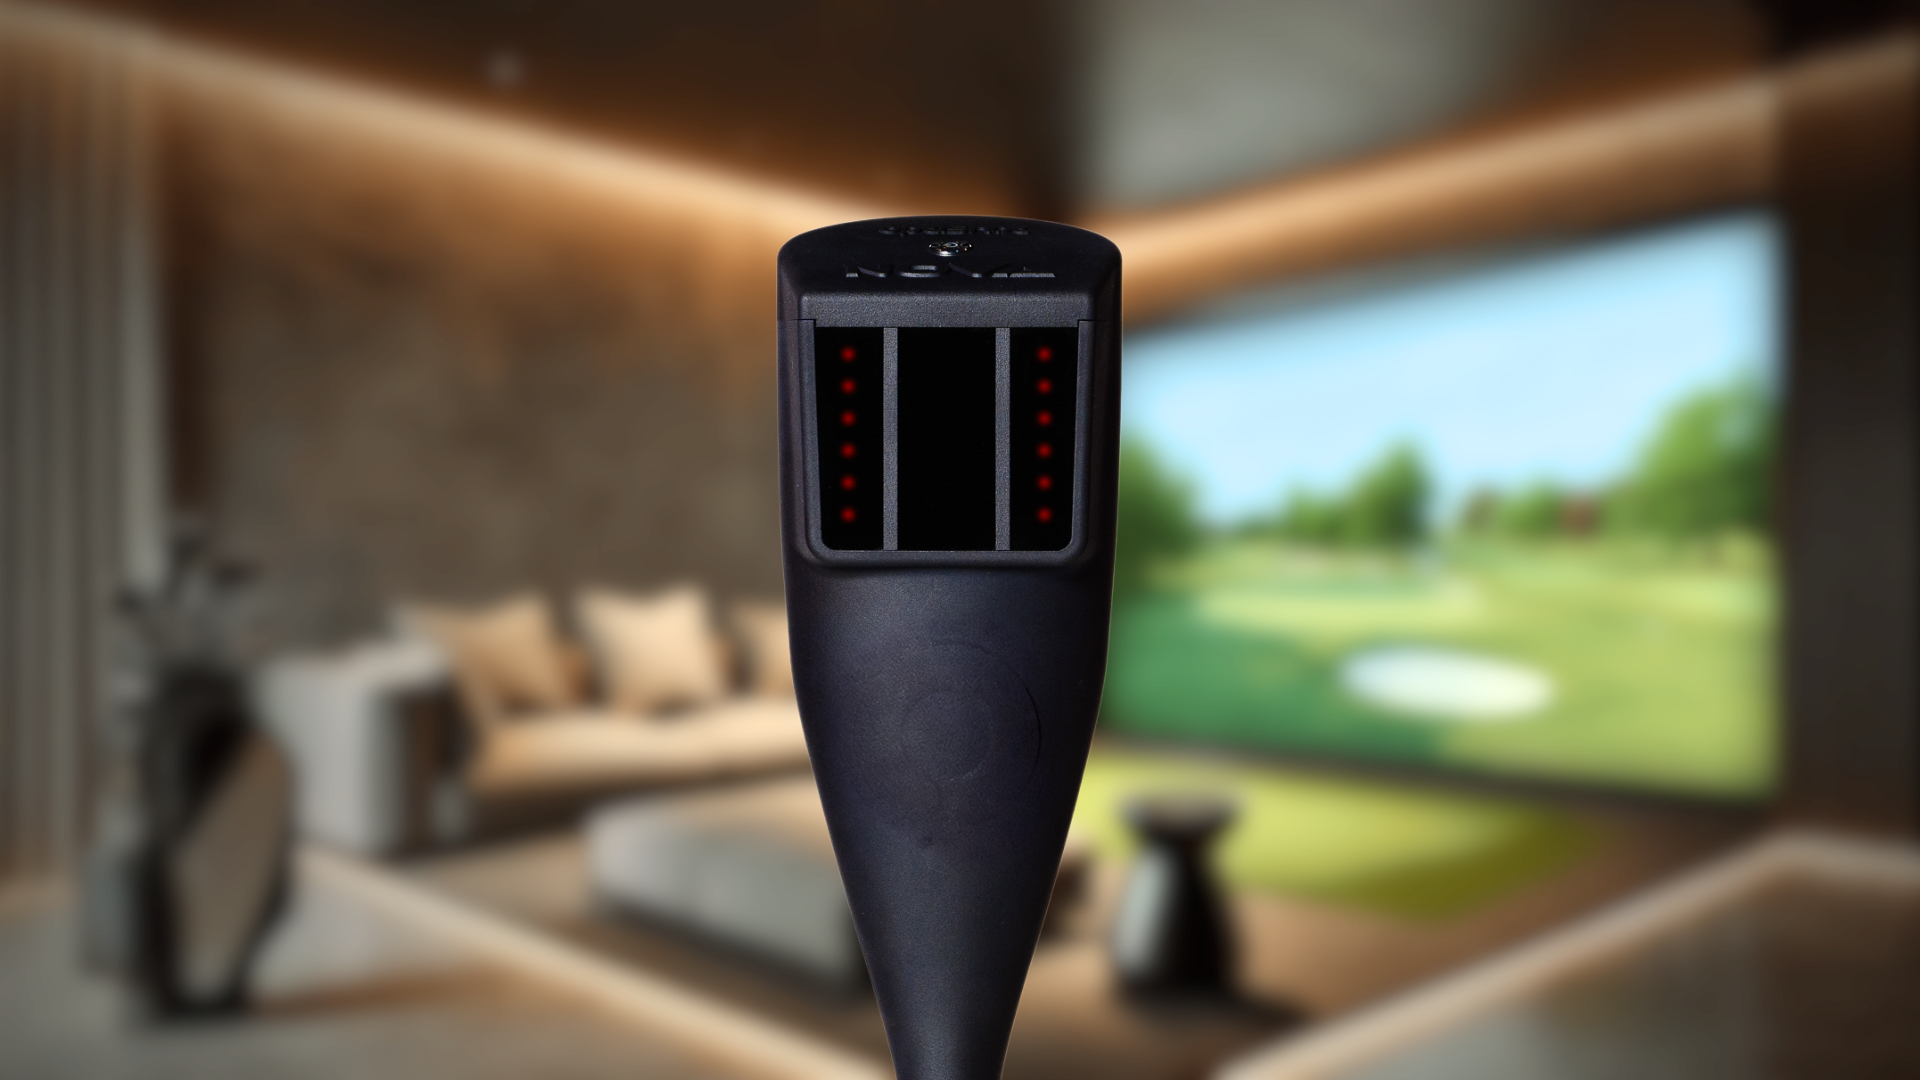
The magic of a golf simulator lies in its launch monitor. These devices use different technologies, like high-speed cameras or doppler radar, to capture dozens of data points from your swing. Some models, like our RSG Mobile, are designed for portability, letting you easily move them from the garage to the driving range. Others are built for permanent indoor setups, offering different features and levels of precision. The key is finding the right balance of accuracy, data, and price for your goals. Don’t feel like you need the most expensive professional-grade unit to get a fantastic and useful home golf experience.
Which Features Should You Look For?
When you start looking at different systems, you'll see a wide range of features. Some launch monitors provide basic data like ball speed and carry distance, while more advanced models offer club path, angle of attack, and spin rate. Think about what you want to achieve. Are you looking to fine-tune your swing with detailed analytics, or do you just want to play fun rounds with friends? Also, consider the software. Some platforms offer world-famous courses, multiplayer capabilities, and skills challenges. Our RSG Pro system, for example, is packed with features for the serious golfer who wants the ultimate immersive experience.
How Much Does a Golf Simulator Cost?
Figuring out the cost of a garage golf simulator can feel like a big question, but it’s more manageable when you break it down. The total price depends entirely on the experience you want to create. Are you looking for a fun way to practice your swing on rainy days, or are you aiming for a professional-grade setup that rivals the pros? Your budget can range from a few thousand dollars for a solid, functional system to well over $10,000 for a premium, immersive experience. Let’s walk through the different tiers to help you find the right fit for your goals and your wallet.
Budget-Friendly Setups ($2,000-$5,000)
If you're just getting started or want to keep your budget in check, an entry-level setup is a fantastic option. For around $3,000, you can build a completely functional and enjoyable garage simulator. This price range typically covers all the essentials: a reliable launch monitor, a hitting mat, a projector, and an impact screen with an enclosure. While it might not have all the advanced analytics of a pro system, it’s more than enough to play full rounds of golf and get valuable feedback on your swing. This is the perfect way to bring the course home without a massive financial commitment.
Example: Packages with Rapsodo or Garmin
Brands like Rapsodo and Garmin have become popular choices for golfers building their first simulator, and for good reason. They offer a great balance of performance and price, making them the centerpiece of many budget-friendly packages. A typical setup built around a monitor like the Garmin Approach R10 will usually include the launch monitor itself, a hitting mat, and a net or a basic enclosure with an impact screen. These kits provide a fantastic entry point, giving you accurate enough data to enjoy virtual rounds and get meaningful practice without a huge initial investment. While you can always source parts individually, many find that pre-configured bundles streamline the process, ensuring all your components are compatible right out of the box.
The Sweet Spot: Mid-Range Systems ($5,000-$10,000)
For golfers who are a bit more serious about their practice, a mid-range system offers a significant step up in quality and accuracy. In this price range, you’ll find launch monitors with more precise data tracking, more durable hitting mats that feel closer to real turf, and higher-resolution projectors for a more realistic visual experience. The software options also tend to be more advanced, offering a wider selection of courses and game modes. Many players find this to be the sweet spot, balancing high performance with a reasonable cost. Our pre-configured golf simulator bundles are a great place to explore options in this tier.
Go Pro: High-End Setups ($10,000+)
When you want the most realistic and immersive indoor golf experience possible, a pro-level setup is the way to go. These systems, which can cost upwards of $20,000, are built with top-of-the-line components. Think launch monitors with high-speed cameras that capture every detail of your swing and ball flight, premium impact screens that deliver a crisp, clear image, and ultra-realistic 4K projectors. This tier is for the dedicated golfer who demands precision, advanced analytics, and a truly lifelike simulation. If you’re ready to build a dream setup, you can even customize your golf room to your exact specifications.
Example: Packages with Flightscope or Uneekor
When you step into the high-end category, you're looking at packages built around industry-leading launch monitors like those from Flightscope or Uneekor. These systems are known for their incredible accuracy and the depth of data they provide, making them a favorite among serious golfers and instructors. A typical package in this range, which can easily exceed $13,000, will bundle a premium launch monitor with a high-quality enclosure, a top-tier hitting mat, and a powerful projector. This all-in-one approach takes the guesswork out of matching components, ensuring everything works together seamlessly. If you're ready to invest in a truly professional-grade experience, you can explore options to customize your golf room with this level of equipment.
Don't Forget These Additional Costs
As you plan your budget, it’s helpful to understand how the costs break down by component, as this is where you can customize your spending. A launch monitor is the heart of your system and can range from under $1,000 to over $20,000. A quality hitting mat that will protect your joints and last for years typically costs between $500 and $700. The enclosure and impact screen can run from $1,000 to $6,000, depending on size and material quality. You’ll also need to factor in the cost of a projector, a computer powerful enough to run the software, and any potential software subscription fees. If you have questions about building a package that fits your budget, feel free to contact an expert on our team.
Finding Sales and Financing Options
The initial investment for a golf simulator can feel like a big hurdle, but there are ways to make it more manageable. Many companies offer financing options that allow you to pay for your setup over time, breaking down the cost into smaller monthly payments. This is a great way to get the system you really want without having to pay for it all at once. Another smart approach is to look for package deals. Buying a complete kit, like one of our RSG Bundles, can often be more cost-effective than purchasing each component separately. If you're unsure which path is best for your budget, don't hesitate to contact an expert on our team. We can walk you through the options and help you find a solution that works for you.
How to Plan Your Perfect Garage Golf Simulator
Before you start adding items to your cart, let's talk about the space itself. A little bit of planning now will save you a ton of headaches later and ensure your garage becomes the golf haven you’re dreaming of. Transforming a garage from a place for cars and storage into a high-performance simulator room involves more than just setting up the equipment. You need to think about space, power, climate, and safety to create an environment that’s both functional and enjoyable. Taking the time to map out these details is the first real step toward building a setup that you'll love using for years to come. It’s all about creating a solid foundation for your investment.
Measure and Map Your Space
This is the golden rule of building a home simulator: measure everything before you buy anything. The last thing you want is to unbox your new system only to find you can’t take a full swing without hitting the ceiling or a wall. Grab a tape measure and confirm your garage has enough room. You’ll generally need at least 9-10 feet of ceiling height, 12 feet of width, and about 16 feet of depth to swing comfortably and safely. A great way to test this is to slowly swing your longest club in the intended area. Also, don’t forget about the mat. A poor-quality mat can ruin the feel of your shots and even lead to injury, so plan for a good one. If you need help visualizing your layout, you can even build your own custom golf room to see how all the pieces fit together.
Using Online Planning Tools
If you’re more of a visual planner, you’re in luck. You don’t have to rely on a tape measure and your imagination alone to figure out your layout. Many companies now offer digital tools that help you see exactly how a simulator will fit into your space. These tools take the guesswork out of the equation, allowing you to experiment with different configurations and components right from your computer. It’s a simple, stress-free way to validate your measurements and make sure you’re choosing the right size equipment before you spend a dime, giving you confidence in your plan from the very beginning.
Mapping Your Setup with a Room Builder
One of the most helpful resources is an online room builder. These interactive guides let you input your garage’s dimensions and then drag and drop different components to create a virtual model of your setup. You can see how much clearance you’ll have around the enclosure and ensure there’s enough depth for your launch monitor and hitting area. This process helps you catch potential issues, like a low-hanging garage door opener or a water heater that’s in the way. It’s the best way to confirm your plan is solid, and you can even use our tool to build your golf room and see exactly how it will all come together.
Getting One-on-One Design Help
While online tools are fantastic, sometimes you have a unique situation or a question that a configurator can’t answer. Maybe you have an oddly shaped garage, support beams to work around, or you’re just not sure which components are the best fit for your specific goals. In these cases, talking to a real person who has seen it all can provide clarity and confidence. Getting personalized advice ensures you’re not just buying a product, but building a solution that’s perfectly tailored to you, your space, and how you want to play.
Working with an Expert Consultant
Don’t hesitate to lean on the experts. Our team has helped thousands of golfers design their dream simulators, and we offer free, one-on-one consultations to help you get it right. We can walk you through your measurements, discuss your budget, and recommend the ideal combination of equipment to match your playing style and improvement goals. Whether you’re trying to decide between the portable RSG Mobile or a more permanent setup, we’re here to provide unbiased advice. There’s no pressure to buy—just a friendly conversation to ensure you have all the information you need. If you’re feeling stuck, contact an expert and let us help you finalize your plan.
Get Your Power and Lighting Right
Great lighting does more than just help you see the ball; it creates the right atmosphere and ensures your launch monitor can accurately track your shots. Avoid harsh, direct overhead lights, which can create distracting shadows and glare on your screen. Instead, opt for soft, diffused lighting. Track lighting mounted on the ceiling or dimmable LED fixtures can work wonders. You’ll also need to think about power. Your projector, launch monitor, computer, and any extra lights or fans all need electricity. Make sure you have enough accessible outlets nearby, and consider using a dedicated power strip with surge protection to keep your valuable electronics safe.
Creating a Comfortable Climate
Let’s be honest, most garages aren’t known for their comfortable, climate-controlled environments. They can get incredibly hot in the summer and frigid in the winter. To make your golf simulator a year-round retreat, you’ll need to manage the temperature. Insulating the garage walls and the main garage door is a fantastic long-term solution for maintaining a more stable temperature. For a quicker fix, a portable space heater or a standalone air conditioning unit can make the space comfortable enough for a few hours of play. This not only makes it more pleasant for you but also helps protect the sensitive electronic components of your simulator from extreme temperatures.
Put Safety First
Creating a safe environment is non-negotiable. You’ll be hitting real golf balls at high speeds in an enclosed space, so you need to take a few precautions. Ensure your impact screen and enclosure are securely installed to handle the force of every shot, from a gentle chip to a full-force drive. Keep the area around your hitting mat clear of any clutter or tripping hazards. This includes managing your cables—use ties or covers to keep them tidy and out of the way. It’s also a good habit to periodically inspect your equipment, checking cables and connections for any signs of wear or damage. If you ever have questions about setup or maintenance, our technical support team is always here to help.
Avoid These Common Setup Mistakes
We’ve seen it all, and we want to help you sidestep the most common pitfalls. The biggest mistake is misjudging the space, so measure twice! Another frequent error is skimping on the hitting mat. A cheap mat won’t feel realistic and can be tough on your joints. Poor lighting is another one—it affects both your experience and the system's accuracy. Finally, don’t underestimate the importance of a proper enclosure. It not only contains errant shots, protecting your walls and belongings, but it also helps create a more immersive visual experience. By avoiding these simple mistakes, you’ll be well on your way to a flawless setup. If you’re feeling unsure about any part of the process, don’t hesitate to contact one of our experts for personalized advice.
Your Essential Equipment Checklist
With your space planned out, it’s time for the fun part: picking your gear. The right components work together to create a seamless and realistic golf experience. Think of it like building a high-performance computer—every part plays a critical role. From the screen that catches your shot to the software that transports you to Pebble Beach, each piece of equipment contributes to the final product. Getting these choices right from the start will save you headaches and help you build a simulator that you’ll love using for years. Let’s walk through the essential items on your checklist.
Choosing Your Screen and Enclosure
Your impact screen is more than just a surface for the projected image; it’s a critical piece of safety equipment designed to absorb the force of a real golf ball. The number one issue to avoid is too much bounce back, which can be both dangerous and disruptive. A high-quality screen provides a bright, clear image while safely stopping your shots. An enclosure surrounds the screen, catching any errant shots and helping to create a more immersive environment by blocking out ambient light. When you build your own golf room, selecting a durable screen and a sturdy enclosure should be a top priority.
Retractable Screens for Multi-Use Spaces
What if your garage needs to be, well, a garage? Not everyone has the luxury of a dedicated golf room, and that’s where retractable screens are a game-changer. If your space doubles as a workshop, home gym, or parking spot, a retractable screen allows you to have the best of both worlds. With the simple push of a button, you can transform your garage into an immersive golf simulator and then retract the screen just as easily when you’re done. This means your space doesn't have to be permanently dedicated to golf. It’s the ultimate solution for maintaining a multi-purpose room, giving you the flexibility to practice your swing without sacrificing the primary function of your garage. When you customize your golf room, considering a retractable option can be the key to making it all work.
Selecting the Right Launch Monitor
The launch monitor is the heart of your simulator. This device uses high-speed cameras or radar technology to capture data about your club and ball at the moment of impact. It measures everything from ball speed and launch angle to spin rate and club path. The right launch monitor for you depends on your space and how you plan to use it. Some units are designed for permanent indoor setups, while others offer the versatility to be easily moved from your garage to the driving range. Exploring different launch monitors will help you find the perfect balance of accuracy, features, and portability for your needs.
Popular Third-Party Launch Monitor Brands
As you explore your options, you'll come across several well-known names in the golf tech world. Brands like Garmin, SkyTrak, and FlightScope are popular choices, each offering a range of models with different features and price points. The key difference often lies in the technology they use—some rely on high-speed cameras while others use doppler radar—which affects the specific data points they capture. Some units excel at providing basic metrics like ball speed and carry distance, while more advanced systems deliver in-depth analytics on club path and spin rate. This variety is great for you, as it means you can find a device that aligns perfectly with your practice goals. It also reinforces the idea that a fantastic home golf experience is possible at any budget, whether you're just starting out or looking for professional-level feedback.
Finding a High-Quality Hitting Mat
Don't underestimate the importance of your hitting mat. It’s the only piece of equipment you physically interact with on every swing, and skimping here can ruin the feel of your entire setup. A cheap, hard mat can cause joint pain and lead to unnatural swing adjustments. A high-quality mat, on the other hand, mimics the feel of real turf, providing realistic feedback and reducing the risk of injury. Look for mats with enough cushioning to be easy on your body but firm enough to provide a stable stance. Many of our simulator bundles include premium mats designed for durability and a true-to-life feel.
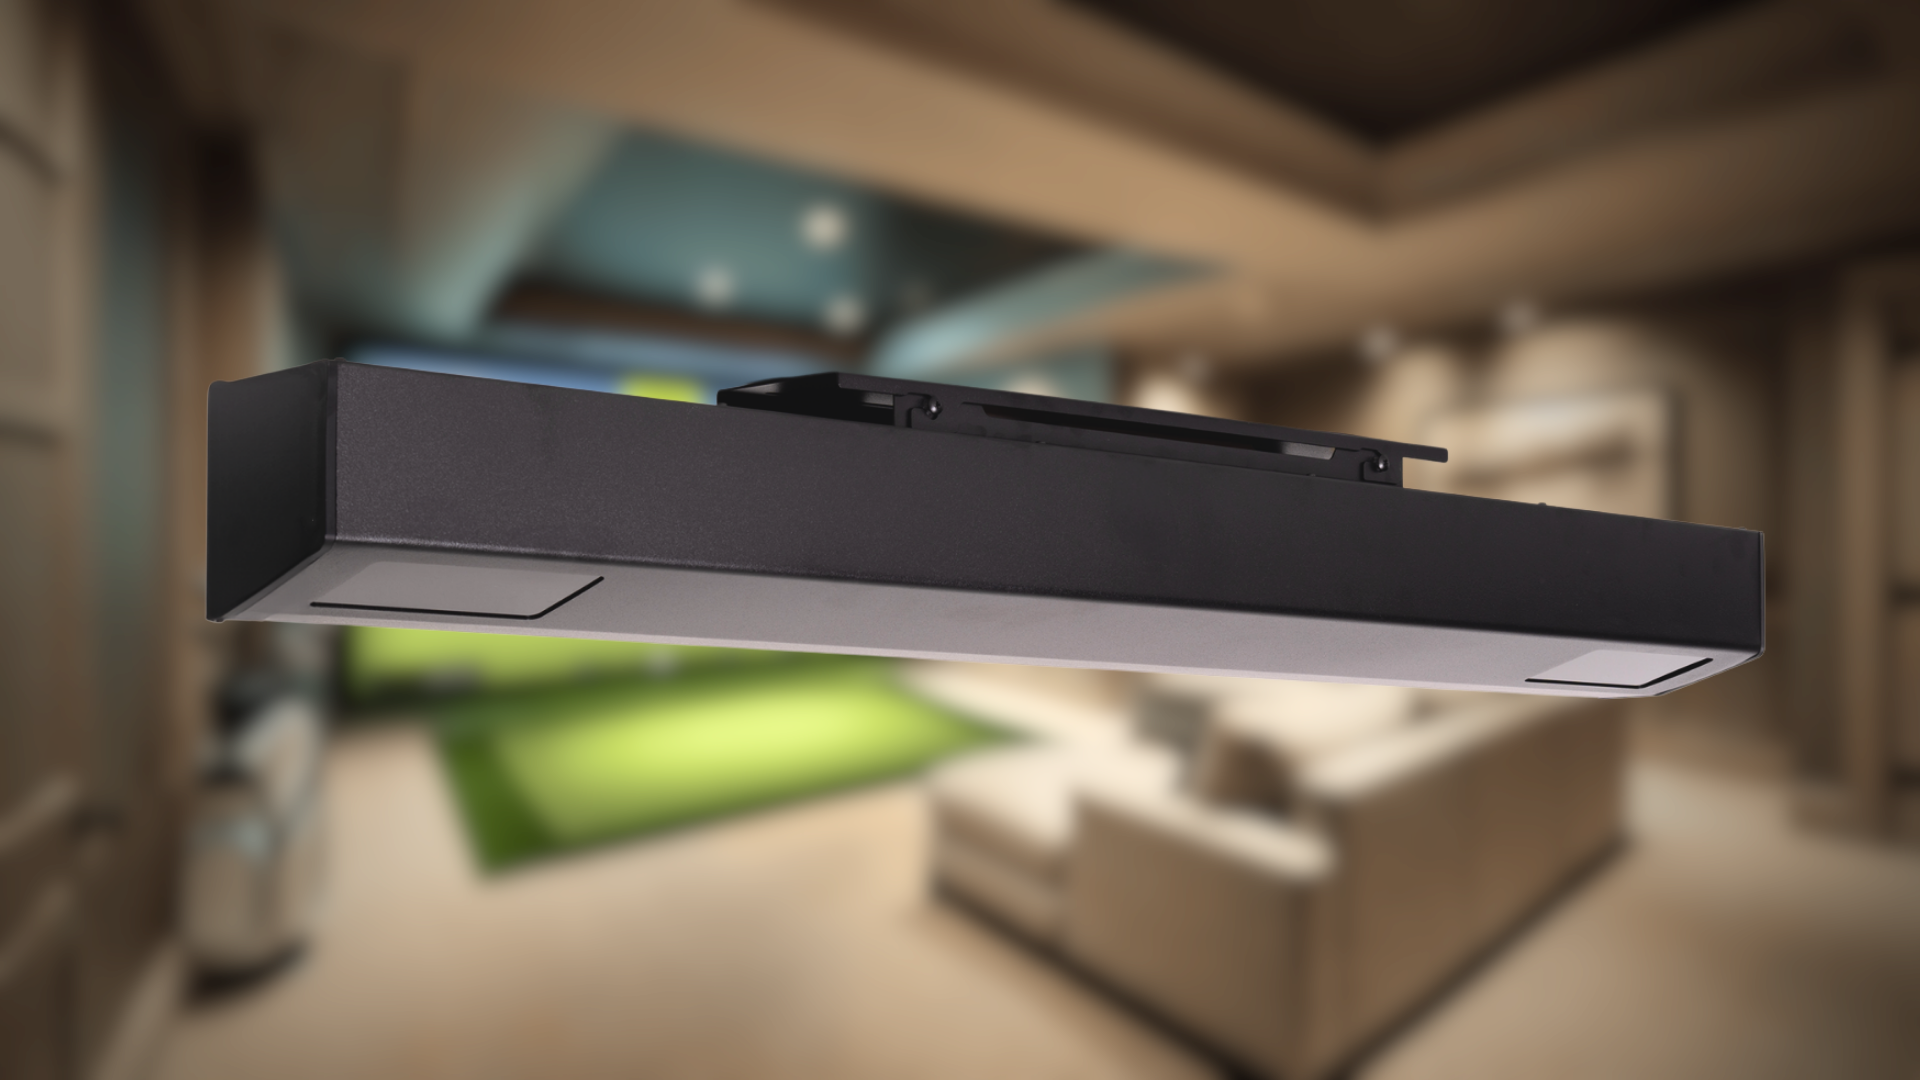
Picking the Best Projector
Your projector brings your virtual course to life, so image quality matters. However, a common misstep is buying a projector before finalizing other components. The ideal projector depends on your room’s dimensions, screen size, and ambient lighting. Key factors to consider are brightness (measured in lumens), resolution (for a crisp picture), and throw ratio, which determines how far from the screen the projector needs to be to fill it. A short-throw projector is often the best choice for garage setups, as it can create a large image from a short distance, reducing the chance of casting a shadow on the screen.
Exploring Software and Course Options
The software is what turns your launch monitor data into an engaging round of golf. It renders the virtual courses, manages game modes, and tracks your performance over time. While some professional-grade systems are packed with complex features, many golfers find that more accessible software provides a surprisingly immersive and enjoyable experience. The best software for you will offer a great selection of courses you want to play, intuitive gameplay, and accurate simulation. Systems like the RSG One come with integrated software that makes it easy to get set up and start playing legendary courses from around the world.
Buying a Complete Package vs. Individual Components
One of the first big decisions you'll make is whether to buy everything in one go or piece your system together over time. Opting for one of our simulator bundles is the most straightforward path. These packages are designed to be compatible right out of the box, which means you don't have to worry about whether your launch monitor will work with your software or if your enclosure is the right size for your screen. It’s a great choice if you want to get up and running quickly without the stress of researching every single component. On the other hand, purchasing individual components gives you total control. This route is perfect if you have a specific launch monitor in mind or want to build your own setup tailored to unique room dimensions. It allows you to mix and match brands and potentially spread the cost out over time. Ultimately, the right choice depends on how hands-on you want to be with the process.
Find Your Perfect Red Stakes Golf Package
Putting together a simulator piece by piece can feel overwhelming. If you’d rather get a complete, ready-to-go system, we’ve designed our packages to make it simple. We’ve bundled our industry-leading technology with all the essentials you need to start playing from day one. Whether you’re looking for a portable practice station or a permanent pro-level setup in your garage, there’s a Red Stakes Golf package that’s perfect for your space and your game.
Each of our systems is built on a legacy of providing accessible, high-quality golf simulation. Let’s walk through the options to find the right fit for you.
The RSG Mobile: Golf Anywhere
If you want to work on your swing without dedicating a permanent room to a simulator, the RSG Mobile is your answer. This innovative system turns your iPhone into a powerful and accurate launch monitor, letting you practice anywhere you have space to swing a club—your backyard, the garage, or even on the go. The app delivers stunning graphics and precise shot tracking right on your Windows 11 computer. Our RSG Mobile Starter Pack bundles the app with a high-quality hitting net and stance mat, giving you everything you need to set up a practice session in minutes. It’s the ultimate in flexibility for the modern golfer.
The RSG One: Your All-in-One System
The RSG One is the ideal solution for golfers who want a complete, hassle-free home simulator. We designed this system to be incredibly user-friendly, so you can spend less time on setup and more time playing. It’s a comprehensive package that includes everything you need for a dedicated golf space in your garage or spare room. By combining our advanced tracking technology with all the necessary components in a single bundle, the RSG One removes the guesswork. It’s the perfect balance of performance and simplicity, delivering a fantastic and reliable indoor golf experience right out of the box.
The RSG Pro: The Ultimate Experience
For the serious golfer committed to taking their game to the next level, the RSG Pro offers our most advanced and immersive experience. This premium package is built with high-end technology that provides incredibly detailed analytics on every swing, giving you the deep feedback you need to make meaningful improvements. The realism is second to none, closely mimicking the look and feel of playing on a real course. If you’re looking for the best in accuracy, data, and overall performance, the RSG Pro delivers a professional-grade simulation that will challenge and refine your skills year-round.
How Our Packages Compare
Choosing the right package comes down to your personal goals, space, and budget. The RSG Mobile offers unmatched portability for practice on the fly. The RSG One provides a seamless, all-in-one solution for a dedicated home setup. And the RSG Pro delivers the ultimate performance for the most dedicated players. Each system is designed to help you play more golf and sharpen your skills. If you’re still not sure which path is right for you, feel free to contact an expert on our team. We’re always happy to talk through your setup and help you find the perfect fit.
How to Maintain Your Golf Simulator
You’ve put in the work to design and build your perfect garage golf setup. Now, let's talk about keeping it in top shape. A little routine maintenance goes a long way in protecting your investment and ensuring every swing is tracked as accurately as the first. Think of it as the digital equivalent of cleaning your clubs—a simple practice that delivers consistent performance.
Calibrate Your System Regularly
For your simulator to give you accurate feedback, it needs to be properly calibrated. Over time, things can shift slightly, so making calibration a regular part of your routine is key. It’s also smart to keep all the components clean. Dust and dirt can build up on your launch monitor’s lenses or sensors, which can interfere with its ability to track the ball. A quick wipe-down of your hitting mat, screen, and launch monitor before a session can make a big difference. For specific instructions on your system, our technical support team is always ready to help.
How to Care for Your Equipment
Your simulator equipment is built to last, but it still needs some basic care. Keeping your impact screen clean is essential for a crisp, clear picture of your virtual course. Gently wipe it down with a soft, damp cloth to remove any dust or ball marks. Every so often, take a moment to inspect your cables and connections. Make sure everything is plugged in securely and check for any signs of wear or damage. Don’t forget your hitting mat, either. After a session, give the turf a quick brush to keep the fibers standing upright and ready for your next round.
Getting the Lighting Just Right
The lighting in your garage can have a surprisingly big impact on your simulator's performance, especially for camera-based systems. Harsh, direct lights can create shadows and glare that may confuse the launch monitor's sensors. The best setup uses soft, diffused lighting that evenly illuminates the hitting area without creating dark spots or bright hotspots. This ensures the system gets a clear view of the ball at impact, leading to more reliable data. If you’re having tracking issues, adjusting your lighting is one of the first and easiest things to check.
Solving Common Simulator Problems
Even the best setups can run into occasional hiccups. One of the most common issues new users face is too much bounce-back from the impact screen. If the ball is rebounding too aggressively, it usually means the screen is too tight. Try adjusting the tension until you find a happy medium between a flat, smooth surface and a safe amount of give. If you’re experiencing inconsistent shot tracking, run through the basics first: check your lighting, clean the launch monitor lens, and make sure the system is calibrated. For anything more complex, you can always contact an expert on our team.
Make Your Investment Last
Your golf simulator is a fantastic piece of technology that can provide years of fun and practice. Treating it with care is the best way to ensure its longevity. Simple habits, like keeping the sensors free of dust and brushing the turf after you play, prevent small issues from becoming bigger problems. Regular maintenance protects the sensitive electronics and keeps your entire setup looking and performing like new. By taking these small steps, you ensure that your home golf simulator remains a reliable and enjoyable part of your golf journey for a long, long time.
Related Articles
- How to Build an At-Home Simulator to Suit Budget & Space
- Golf Simulator at home? Yes, please!
- RSG PRO | Studio Bundle
Frequently Asked Questions
What's the absolute minimum ceiling height I need for a garage simulator? While 10 feet is the ideal height for a comfortable, unrestricted swing with your driver, you can generally make it work with a ceiling that is at least 9 feet high. The best way to know for sure is to stand in your garage and take a few slow, deliberate practice swings with your longest club. If you feel confident you won't hit anything, you're likely in good shape.
If I have a limited budget, where should I focus my spending? Your two most important investments will be the launch monitor and the hitting mat. The launch monitor is the brain of the entire system, providing the data that makes the simulation feel real. The hitting mat is the only piece of equipment you physically interact with on every shot, and a quality one will protect your joints and provide realistic feedback. You can always upgrade your screen or projector later, but starting with a great mat and monitor is key.
Do I need to be a tech expert to set up and use one of these systems? Not at all. Modern simulators, especially complete packages like our RSG One, are designed to be very user-friendly. Most of the setup involves assembling the enclosure and connecting a few components, much like setting up a home entertainment system. We provide clear instructions, and if you ever run into a snag, our technical support team is here to walk you through it.
Can I use my simulator for more than just playing rounds of golf? Absolutely. In fact, one of the biggest benefits of having a home simulator is its power as a practice tool. These systems provide valuable data on things like ball speed, launch angle, and spin rate on every single shot. This immediate feedback is incredibly useful for targeted practice sessions, helping you understand your swing and make real improvements to your game.
How do I keep my simulator accurate over time? Maintaining your system's accuracy is straightforward and doesn't require much work. The most important habit is to periodically wipe the lens or sensors on your launch monitor to keep them free of dust. It's also a good idea to run your system's calibration tool every so often, especially if you move any of the components. These simple steps ensure your simulator continues to provide reliable data for years to come.
Getting Support for Your Simulator
Once your new simulator arrives, the excitement to get it set up and start playing is real. But for many, the idea of assembling all the pieces can feel a bit intimidating. The good news is, you’re not on your own. A quality simulator company understands that the customer experience doesn’t end at checkout. From detailed setup guides to one-on-one technical help, the right support system is in place to ensure you get from unboxing to your first tee shot smoothly and confidently. At Red Stakes Golf, we’re committed to helping you every step of the way, ensuring your investment provides years of enjoyment without the initial setup stress.
Installation and Setup Resources
Before you even open the first box, there are tools available to help you succeed. Many companies provide online resources designed to guide you through the planning and installation process. These tools can help you visualize how the components will fit in your specific space, preventing common setup errors before they happen. For instance, our interactive tool to customize your golf room lets you map out your dimensions and select components that are perfectly suited for your garage. This kind of planning resource takes the guesswork out of the equation, giving you a clear blueprint to follow and ensuring a perfect fit for your home.
Instructional Videos and Assembly Manuals
For most of us, seeing is believing. That’s why clear, step-by-step instructional videos and detailed assembly manuals are so important. Visual guides are incredibly helpful for understanding how the enclosure frame fits together, how to properly hang the impact screen, and where to position your launch monitor for optimal accuracy. A well-written manual can fill in the specific details, providing diagrams and checklists to keep you on track. These resources are designed to make the assembly process feel less like a complex construction project and more like putting together a piece of furniture, empowering you to build your setup with confidence.
Post-Purchase Technical Support
Even with the best instructions, questions can pop up. Maybe you’re having trouble calibrating your system or need help connecting the software to your computer. This is where dedicated post-purchase support becomes invaluable. Having access to a team of experts who know the product inside and out provides incredible peace of mind. Whether you need to troubleshoot a specific issue or just want advice on getting the most out of your system’s features, help should be easy to find. If you ever run into a challenge with your setup, you can always reach out to our technical support team for friendly, expert assistance.
Using a Golf Simulator for Business
A golf simulator can be more than just a personal practice tool; it can also be a powerful asset for a business. The rise of indoor golf bars and entertainment centers shows just how popular simulated golf has become. For entrepreneurs, this trend presents a fantastic business opportunity. For existing businesses, adding a golf simulator can create a unique amenity that attracts customers and enhances their experience. Whether you're looking to build a new venture from the ground up or add a new feature to your current space, a simulator offers a versatile and engaging way to generate revenue and create a memorable destination for clients, guests, or employees.
Starting Your Own Simulator Business
The demand for year-round golf entertainment is growing, making an indoor golf simulator business an attractive venture. These facilities can range from dedicated sports bars with multiple simulator bays to smaller, boutique practice studios. The key is creating an inviting atmosphere where people can play, practice, and socialize. Starting a business like this requires careful planning, from choosing the right location to selecting durable and reliable equipment that can handle commercial use. We can help you equip your new venture with high-quality, affordable simulators that provide a fantastic customer experience and a solid return on your investment. If you're exploring this path, contact an expert on our team to discuss your project.
Custom Setups for Commercial Spaces
A golf simulator can also be a standout amenity for a wide range of commercial properties. Hotels, apartment complexes, and corporate offices are increasingly adding simulators to their recreational facilities to attract and retain clients and tenants. It’s a unique perk that offers entertainment and a great team-building activity. These commercial installations often require a more tailored approach to fit a specific room or aesthetic. We can work with you to design and build a custom golf room that integrates seamlessly into your space, providing a professional-grade experience for your guests or employees. It’s an investment that adds significant value and sets your property apart from the competition.